
The rebound damping force adjuster is located at the upper end of the rear shock absorber.
A. Rebound Damping Force Adjuster
B. To increase damping force
C. To decrease damping force
NOTICE
Do not turn the rebound damping force adjuster beyond the fully seated position or the adjusting mechanism may be damaged.
Rebound Damping Force Setting
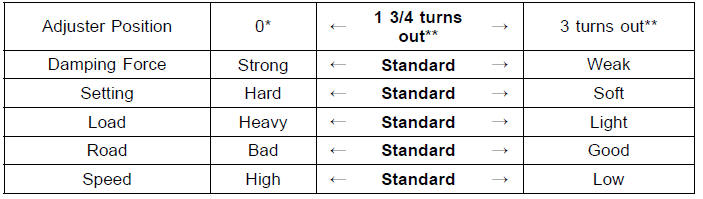
*: This position is the fully seated position (turned fully clockwise).
**: Out from the fully seated position (turned fully clockwise). This adjustment range may not exactly match the number shown in the table due to small tolerance of production.
 Rear Shock Absorber Inspection
 Compression Damping Force Adjustment
Front Wheel Rotation Sensor Signal (Service Code 27)
Front Wheel Rotation Sensor Signal Inspection
The front wheel rotation sensor sends the signal to the
ECU through the KIBS hydraulic unit (KIBS equipped
models). For other than KIBS equipped models, the
signal is sent directly to the ECU.
The ECU uses the wheel rotation sensor signal for KTRC
...
Immobilizer System (Equipped Models)
This motorcycle is equipped with an immobilizer system to protect the
motorcycle from theft. This
system provides a theft proof device by means of matching a code between the
inbuilt key transponder
and ECU. If the code does notmatch, ignition system, injectors, subthrottle
valve actuator an ...
Subthrottle Sensor Input Voltage Inspection
NOTE
Be sure the battery is fully charged.
Turn the ignition switch to OFF.
Remove the air cleaner housing (see Air Cleaner Housing
Removal in the Fuel System (DFI) chapter)
Disconnect the subthrottle sensor connector and connect
the harness adapter [A] between these connectors.
Spec ...