
The compression damping force adjusters for high and low speeds are located on the gas reservoir at the left side of the rear shock absorber.
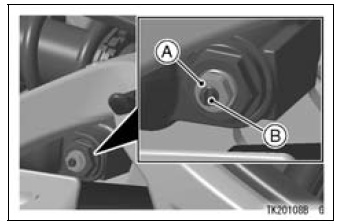
A. High Speed Adjuster
B. Low Speed Adjuster
NOTE
Turning the high speed adjuster has the low speed adjuster turning. Although the low speed adjuster turns with the high speed adjuster when turning the high speed adjuster, the low speed adjuster setting position dose not change.
Low Speed Compression Damping Adjustment
 Rebound Damping Force Adjustment
 High Speed Compression Damping Adjustment
Exploded View
5. Other than US, CA, and CAL Models
6. The big diameter side of the dampers faces upward.
G: Apply grease.
L: Apply a non-permanent locking agent.
R: Replacement Parts
S: Follow the specified tightening sequence.
SS: Apply silicone sealant.
11. Immobilizer Ampli ...
Coolant Filling
Remove the bolts and quick rivets.
Detach the tabs and remove the right
fairing and cover.
A. Bolts
B. Quick Rivet
C. Large Quick Rivet
D. Tabs
E. Right Fairing and Cover
NOTE
The right fairing and cover uses the
quick rivets and large quick rivet.
The large quick rivet ca ...
Compression Damping Force Adjustment
There are two adjustments you can make to the compression
damping force.
High Speed Compression Damping Adjuster [A]
Low Speed Compression Damping Adjuster [B]
To adjust the high speed compression damping force, turn
the outside damping adjuster with a wrench to the desired
position ...