
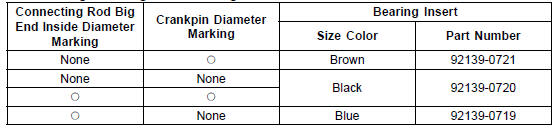
Connecting Rod Big End Bearing Insert Selection
Crankshaft Main Bearing Insert Selection
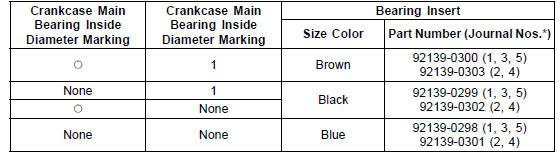
*: The bearing inserts for Nos. 2 and 4 journals have an oil groove, respectively.
 Exploded View
 Special Tools and Sealants
Overview
Kawasaki Intelligent anti-lock Brake System (KIBS) offers enhanced braking
stability (ABS performance
equivalent to the current model) to supersportmodels, which pitch more than most
motorcycles
and also offers high-precision front and rear brake pressure control
(high-precision ABS) for spo ...
Self-Diagnosis Procedures
NOTE
Use a fully charged battery when conducting
self-diagnosis. Otherwise, the light (LED) and symbol
do not light or blink.
Turn the ignition switch to ON.
When a problem occurs with DFI system and ignition system,
the warning indicator light (LED) [A] goes on and
FI warning symbol ...
S-KTRC Mode Indicator
This indicator shows the selected
S-KTRC mode. For more detailed information
about the S-KTRC mode,
see Sport-Kawasaki TRaction Control
(S-KTRC) section in the How to Ride
the Motorcycle chapter
A. S-KTRC Mode Indicator
NOTE
When the all S-KTRC mode indicators
go off, the battery voltag ...