
The spring preload adjuster is located at the lower end of each front fork leg and can be adjusted.
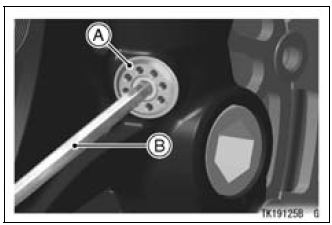
A. Spring Preload Adjuster
B. Hexagon Wrench
Spring Preload Setting
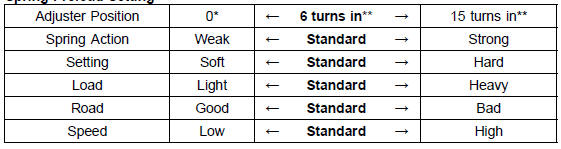
*: This position is the fully seated position (turned fully counterclockwise).
**: In from the fully seated position (turned fully counterclockwise). This adjustment range may not exactly match the number shown in the table due to small tolerance of production.
 Front Fork Inspection
 Compression Damping Force Adjuster and Rebound
Damping Force Adjuster Adjustment
Compression Damping Force Adjuster and Rebound
Damping Force Adjuster AdjustmentSpring Plate Free Play Adjustment
NOTE
The free play adjustment is performed by replacing the
steel plate(s).
Measure the clutch spring plate free play (see Clutch
Spring Plate Free Play Measurement), and then replace
the steel plate(s) which brings the free play within the
usable range.
Spring Plate Free Play
Usable ...
Check 3-3: High Beam Indicator Light (LED) Inspection
Connect the leads in the same circuit as Check 3-2.
Connect the terminal [7] to the battery (+) terminal.
Check that the high beam indicator light (LED) [A] goes
on.
If the indicator light does not go on, replace the meter unit.
...
For Primary Fuel Injectors
Remove the air cleaner housing (see Air Cleaner Housing
Removal).
Disconnect the primary fuel injector connector [A].
Connect a digital meter to the terminals in each primary
fuel injector [A].
Measure the primary fuel injector resistance.
Primary Fuel Injector Resistance ...