

Special Tool - Hand Tester: 57001-1394
Replace the relay.
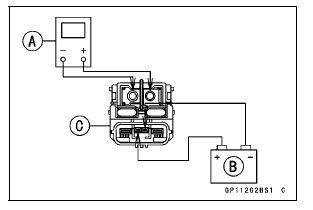
Testing Relay Tester Range: × 1 Ω range
When battery is connected → 0 Ω When battery is disconnected → ∞ Ω
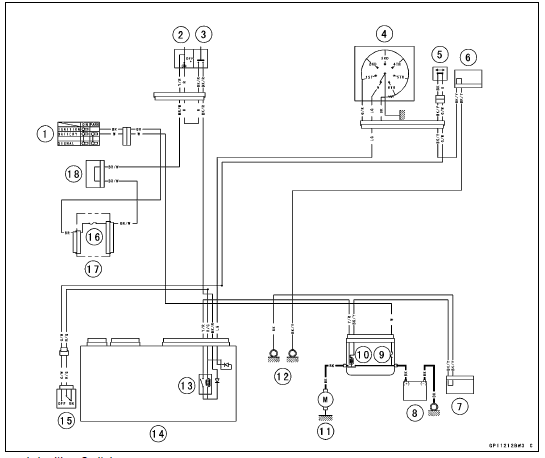
1. Ignition Switch
2. Engine Stop Switch
3. Starter Button
4. Gear Position Switch
5. Sidestand Switch
6. Joint Connector E
7. Joint Connector B
8. Battery
9. Main Fuse 30 A
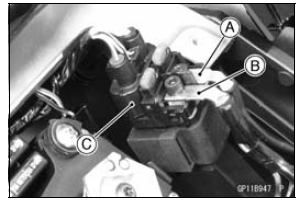
10. Starter Relay
11. Starter Motor
12. Frame Grounds
13. Starter Circuit Relay
14. Relay Box
15. Starter Lockout Switch
16. Ignition Fuse 15 A
17. Fuse Box 1
18. Joint Connector F
 Right-hand End Cover Inspection
 Lighting System
Upper Fairing Assembly Disassembly
Remove:
Upper Fairing Assembly (see Upper Fairing Assembly
Removal)
Headlight (see Headlight Removal/Installation in the
Electrical System chapter)
City Light (LED) (see City Light (LED) Removal/Installation
in the Electrical System chapter)
Remove the screws [A], and separate each ...
Rear Sprocket Warp Inspection
Raise the rear wheel off the ground with the stand so that
it will turn freely.
Set a dial gauge [A] against the rear sprocket [B] near the
teeth as shown in the figure, and rotate [C] the rear wheel
to measure the sprocket runout (warp). The difference
between the highest and lowest di ...
Fuses
Fuses are arranged in the fuse boxes
located under the passenger’s seat and
in the left fairing. The main fuse is
located under the passenger’s seat.
If a fuse fails during operation, inspect
the electrical system to determine
the cause, and then replace it with
a new fuse of proper amp ...