
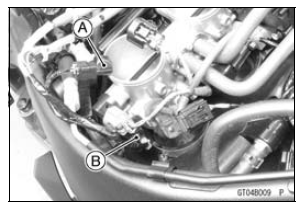
Disconnect the throttle sensor setting adapter [A] from the connector of the main harness side.
Special Tool - Throttle Sensor Setting Adapter: 57001 -1538
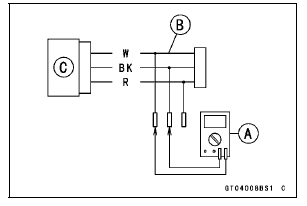
Connect the setting adapter [B] to the sensor connector only.
Connect a digital meter [A] to the setting adapter [B].
Main Throttle Sensor [C]
Main Throttle Sensor Resistance
Connections to Adapter:
W (sensor BL) lead ← → BK (sensor BR/BK) lead
Standard: 4 6 kΩ
6 kΩ
If the reading is out of the standard, replace the throttle body assy.
If the reading is within the standard, check the output voltage (see Main Throttle Sensor Output Voltage Inspection).
 Main Throttle Sensor Input Voltage Inspection
 Main Throttle Sensor Output Voltage Inspection
Air Switching Valve Installation
Install the air switching valve [A] with hose [B] as shown
in the figure.
Front [C]
Left Side View [D]
White Paint [E]
Air Switching Valve Operation Test
Refer to the Air Suction System Damage Inspection in the
Periodic Maintenance chapter.
Air Switching Valve Unit Test ...
Camshaft Removal
Remove:
Cylinder Head Cover (see Cylinder Head Cover Removal)
Crankshaft Sensor Cover (see Crankshaft Sensor Removal
in the Electrical System chapter)
Using a wrench on the timing rotor bolt [A], turn the crankshaft
clockwise until the line [B] (TDC mark for #1,4 pistons)
on the timin ...
Swingarm Bearing Removal
Remove:
Swingarm (see Swingarm Removal)
Collar [A]
Oil Seals [B]
Sleeve [C]
Circlip [D] (Right Side)
Special Tool - Inside Circlip Pliers: 57001-143
Remove the ball bearing and needle bearings.
Special Tool - Oil Seal & Bearing Remover [A]: 57001-1058
...