
NOTE
Be sure the battery is fully charged.
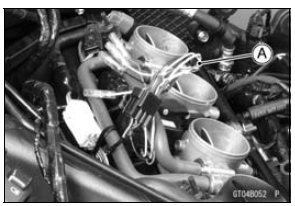
Main Harness [B] Subthrottle Valve Actuator [C]
Special Tool - Measuring Adapter: 57001-1700
Connect the peak voltage adapter [D] and a digital meter [E] to the measuring adapter leads.
Special Tool - Peak Voltage Adapter: 57001-1415 Type: KEK-54-9-B

Special Tool - Peak Voltage Adapter: 57001-1415 Type: KEK-54-9-B
Subthrottle Valve Actuator Input Voltage Connections to Adapter:
(I) Digital Meter (+) → R (actuator BK/O) lead Digital Meter (–) → Battery (–) terminal (II) Digital Meter (+) → BK (actuator G) lead Digital Meter (–) → Battery (–) terminal (III) Digital Meter (+) → W (actuator P/BL) lead Digital Meter (–) → Battery (–) terminal (IV) Digital Meter (+) → Y (actuator Y/BK) lead Digital Meter (–) → Battery (–) terminal
Input Voltage
Standard: About DC 8.5  10.5 V and
then 0 V or
About DC 8.5  10.5 V
If the reading is in specification, but the actuator does not operate, replace the throttle body assy.
If the reading is out of the specification, remove the ECU and check the wiring for continuity between main harness connector.
Special Tool - Hand Tester: 57001-1394
Disconnect the ECU and actuator connectors.
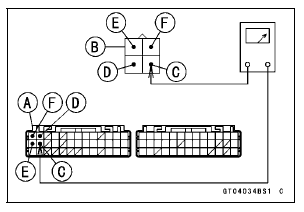
Wiring Continuity Inspection ECU Connector [A] ←→ Subthrottle Valve Actuator Connector [B] G lead (ECU terminal 15) [C] BK/O lead (ECU terminal 2) [D] P/BL lead (ECU terminal 14) [E] Y/BK lead (ECU terminal 1) [F]
If the wiring is good, check the ECU for its ground and power supply (see ECU Power Supply Inspection in the Fuel System (DFI) chapter).
If the ground and power supply are good, replace the ECU (see ECU Removal/Installation in the Fuel System (DFI) chapter).
Subthrottle Valve Actuator Circuit
1. ECU
2. Subthrottle Valve Actuator
 Subthrottle Valve Actuator Resistance Inspection
Main Throttle Sensor Input Voltage Inspection
NOTE
Be sure the battery is fully charged.
Turn the ignition switch to OFF.
Remove the throttle body assy (see Throttle Body Assy
Removal in the Fuel System (DFI) chapter).
Do not disconnect the connectors of the throttle body
assy.
Disconnect the main throttle sensor connector ...
General Information
All rights reserved. No parts of this publication may be reproduced, stored
in a retrieval system, or
transmitted in any form or by any means, electronic mechanical photocopying,
recording or otherwise,
without the prior written permission of Quality Assurance Division/Motorcycle &
Engin ...
Warning/Indicator Lights
: When the
transmission is in
neutral, the neutral indicator light goes
on.
: When the
headlight is on high
beam, the high beam indicator light
goes on.
: When the
turn signal switch is
pushed to the left or right, the turn signal
indicator light blinks. ...
