
NOTICE
Do not lap the valve to the valve seat, using the grinding compound. It will come off oxide film treated surface of the valve.
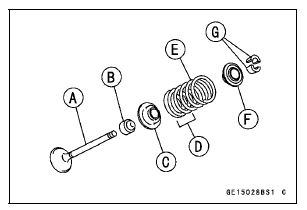
Valve Stem [A] Oil Seal [B] Spring Seat [C] Closed Coil End [D] Valve Spring [E]: EX - Yellow Paint IN - White Paint (∼ ZX100JBF/KBF Early Models) Purple Paint (ZX100JBF/KBF Late Models ∼) Retainer [F] Split Keepers [G]
 Valve Removal
 Valve Guide Removal
Brake Fluid Change
NOTE
The procedure to change the front brake fluid is as follows.
Changing the rear brake fluid is the same as for
the front brake.
Level the brake fluid reservoir.
Remove:
Screw [A]
Stopper [B]
Front Brake Reservoir Cap [C]
Diaphragm Plate
Diaphragm
Remove the rubb ...
Fuel Hose Replacement
Remove the fuel tank (see Fuel Tank Removal in the Fuel
System (DFI) chapter).
WARNINGFuel is flammable and explosive under
certain conditions
and can cause severe burns. Be prepared
for fuel spillage; any spilled fuel must be completely
wiped up immediately. When the fue ...
Throttle Body Assy Holder Installation
Be sure to install the new O-rings [A].
Using a high flash-point solvent, clean off any oil or dirt
that may be on the silicone sealant coating area. Dry
them with a clean cloth.
Apply silicone sealant to any two positions of the new O
-ring.
Sealant - Liquid Gasket, TB1211F: 92104-0 ...