
Measure the outside diameter [D] of the seating pattern on the valve seat.
If the outside diameter is too large or too small, repair the seat (see Valve Seat Repair).
Valve Seating Surface Outside Diameter Standard:
Exhaust 23.9  24.1 mm (0.941
 0.949 in.)
Intake 30.4  30.6 mm (1.197
 1.205 in.)
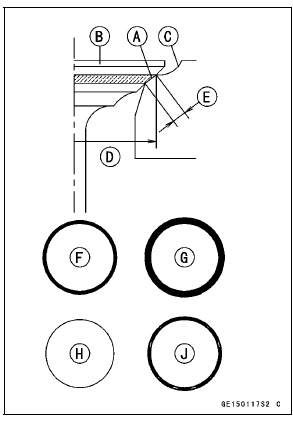
Measure the seat width [E] of the portion where there is no build-up carbon (white portion) of the valve seat with a vernier caliper.
Good [F]
If the width is too wide [G], too narrow [H] or uneven [J], repair the seat (see Valve Seat Repair).
Valve Seating Surface Width Standard:
Exhaust 0.8  1.2 mm (0.03
 0.05 in.)
Intake 0.5  1.0 mm (0.02
 0.04 in.)
 Valve-to-Guide Clearance Measurement (Wobble Method)
 Valve Seat Repair
Lap Counter/Coolant/Intake Air Temperature Meter
This meter shows the coolant temperature,
the intake air temperature or
the lap number. The lap number is displayed
in the stop watch mode, refer to
the “Stop Watch” item in this section.
A. Lap Counter/Coolant / Intake Air
Temperature Meter
The coolant temperature meter and
inta ...
Rebound Damping Force Adjustment
The rebound damping force adjuster
is located at the upper end of the rear
shock absorber.
A. Rebound Damping Force Adjuster
B. To increase damping force
C. To decrease damping force
Using a screwdriver turn the rebound
damping force adjuster clockwise
to increase rebound damping or ...
KIBS Motor Relay Inspection (Service Code b 35)
Check the KIBS motor relay fuse (25 A) [A] (see Fuse
Inspection in the Electrical System chapter)
If the fuse is good, check the wiring continuity as follows.
Disconnect:
Battery Positive Cable (see Battery Removal in the Electrical
System chapter)
KIBS Hydraulic Unit Lead Connector (see ...