
Insufficient clutch free play will cause the engine braking effect to be more sudden, resulting in rear wheel hop. On the other hand, if the free play is excessive, the clutch lever may feel “spongy” or pulsate when pulled.
Collar [A]
Needle Bearing [B]
Sleeve [C]
Clutch Housing [D]
Spacer [E]
Clutch Hub [F]
Sub Clutch Hub [G]
Friction Plates (48 Lining Blocks) [H] (#1, #10)
Steel Plates (T = 2.9) [I] (#1 
#7)
Spring Seat [J]
Spring [K]
Friction Plates (36 Lining Blocks) [L] (#2
 #9)
#9)
Steel Plates (T = 2.6) [M] (#8, #9)
Clutch Spring Plate [N]
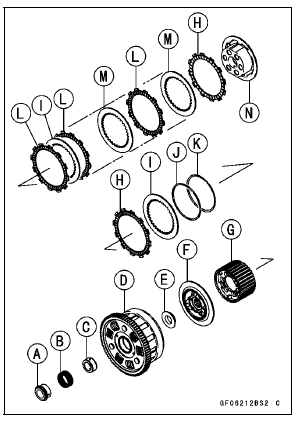
Drive Shaft [D]
Spring Plate Free Play
Usable Range: 0.05  0.70 mm (0.002
 0.028 in.)
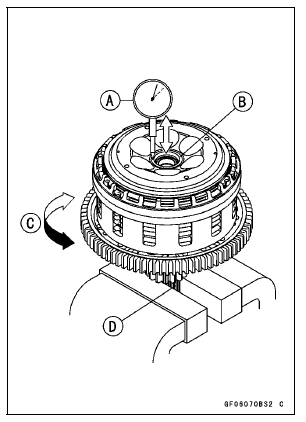
If the free play is not within the usable range, change all of the friction plate and measure the free play again.
If the free play is not within the usable range, adjust the free play (see Spring Plate Free Play Adjustment).
 Clutch Installation
 Spring Plate Free Play Adjustment
ECU Removal
NOTICE
Never drop the ECU especially on a hard surface.
Such a shock to the ECU can damage it.
Remove the upper air cleaner housing (see Air Cleaner
Element Replacement in the Periodic Maintenance chapter).
Lift up the ECU [A] with rubber protector [B] to disconnect
the connectors [C]. ...
Hub Bearing Removal
Remove the wheels (see Front/Rear Wheel Removal),
and take out the following.
Collars
Coupling (Out of rear hub)
Grease Seals
Use the bearing remover to remove the hub bearings [A].
NOTICE
Do not lay the wheel on the ground with the disc
facing down. This can damage or warp the d ...
Stopping the Motorcycle in an Emergency
Your Kawasaki Motorcycle has been
designed and manufactured to provide
you optimum safety and convenience.
However, in order to fully benefit
from Kawasaki’s safety engineering
and craftsmanship, it is essential that
you, the owner and operator, properly
maintain your motorcycle and becom ...