
NOTE
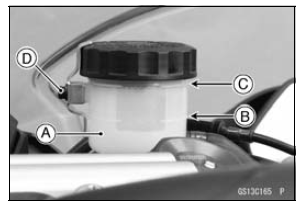
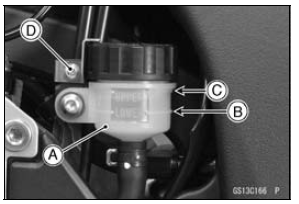
Hold the reservoir horizontal by turning the handlebar when checking brake fluid level.
If the fluid level is lower than the lower level line, fill the reservoir to the upper level line [C].
Remove the stopper [D].
If the fluid level is lower than the lower level line, fill the reservoir to the upper level line [C].
| WARNING Mixing brands and types of brake fluid can reduce the brake system’s effectiveness and cause an accident resulting in injury or death. Do not mix two brands of brake fluid. Change the brake fluid in the brake line completely if the brake fluid must be refilled but the type and brand of the brake fluid that is already in the reservoir are unidentified. |
Recommended Disc Brake Fluid
Grade: DOT4
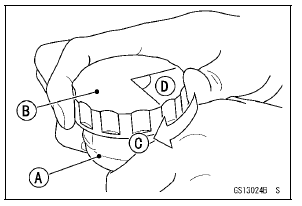
First, tighten the brake fluid reservoir cap [B] clockwise [C] by hand until slight resistance is felt indicating that the cap is seated on the reservoir body, then tighten the cap an additional 1/6 turn [D] while holding the brake fluid reservoir body [A].
Torque - Front Brake Reservoir Stopper Screw: 1.2 N·m (0.12 kgf·m, 11 in·lb)
 Brake Hose and Pipe Damage and Installation Condition Inspection
 Brake Pad Wear Inspection
Meter instruments
Upper Button
Lower Button
Tachometer (with Shift-Up
Indicator)
Red Zone
Ambient Brightness
Sensor
Turn Signal Indicator Light
Warning Indicator Light
(Red)
Neutral Indicator Light
Multifunction Meter
High Beam Indicator Light
Warning Indicator Light
(Yellow)
Fuel ...
Stopping the engine
Close the throttle completely.
Shift the transmission into neutral
Turn the ignition key to “OFF”.
Support the motorcycle on a firm,
level surface with the side stand.
Lock the steering.
NOTE
The motorcycle is equipped with a
vehicle-down sensor, which causes
the engine to sto ...
Wheel Rotation Sensor Rotor Inspection
Remove:
Wheels (see Front/Rear Wheel Removal in the
Wheels/Tires chapter)
Brake Disc Mounting Bolts [A]
Sensor Rotor [B]
Front Wheel [C]
Rear Wheel [D]
Visually inspect the wheel rotation sensor rotor.
If the rotor is deformed or damaged (chipped teeth [A]),
replace the ...