

If any of the cylinder inside diameter measurements exceeds the service limit, replace the crankcase.
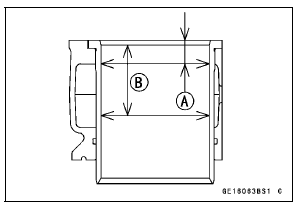
10 mm (0.39 in.) [A] 60 mm (2.36 in.) [B]
Cylinder (Upper Crankcase) Inside Diameter
Standard: 75.994  76.006 mm
(2.9919  2.9924 in.)
Service Limit: 76.09 mm (2.996 in.)
 Piston Installation
 Piston Wear Inspection
Engine Oil Flow Chart
1. Oil Screen
2. Oil Pump
3. Oil Pressure Relief Valve
4. Oil Filter
5. Oil Pipe
6. Oil Cooler
7. Balancer Oil Passage
8. Main Oil Passage
9. Crankshaft Oil Passage
10. Oil Pressure Switch
11. Camshaft Oil Passages
12. Drive Shaft Oil Passage
13. Output Shaft Oil Passage
14. Starter ...
Air Suction Valve Inspection
Remove the air suction valve (see Air Suction Valve Removal).
Visually inspect the reeds [A] for cracks, folds, warps,
heat damage or other damage.
If there is any doubt as to the condition of the reeds, replace
the air suction valve as an assembly.
Check the reed contact areas [B] of ...
RiderŌĆÖs Seat Installation
Insert the tabs on the front of the
riderŌĆÖs seat into the slots in the frame
and secure the seat with mounting
bolts.
Install the seat cover and bolts.
A. RiderŌĆÖs Seat
B. Tabs
C. Slots
D. Stays ...