
ECU Communication Line Inspection
When the data is not sent from the ECU to the meter unit for more than about 10 seconds, the service code 39 is displayed.
The data is sent through the CAN communication line.
The service code 39 is detected with the meter unit.
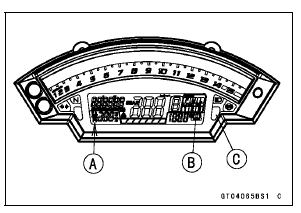
When the user mode, this communication error blinks the following items besides the FI warning symbol [A].
Power Mode and S-KTRC Symbols [B] Yellow Color LED [C]
If the CAN communication line resistance is normal, check the wiring according following procedure.
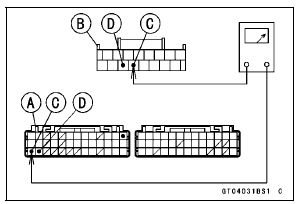
Disconnect the ECU and meter unit connectors.
Special Tool - Hand Tester: 57001-1394
Wiring Inspection ECU Connector [A] ←→ Meter Unit Connector [B] GY/BL lead (ECU terminal 27) [C] LB lead (ECU terminal 28) [D]
ECU Communication Line Circuit
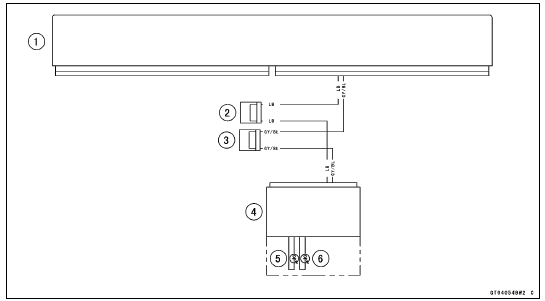
1. ECU
2. Joint Connector D
3. Joint Connector C
4. Meter Unit
5. Warning Indicator Light (LED, Yellow)
6. Warning Indicator Light (LED, Red)
 Blank Key Detection (Service Code 36, Equipped Models)
Rear Fender Front Installation
Installation is the reverse of removal. Note the following.
Run the harness, cables and leads correctly (see Cable,
Wire, and Hose Routing section in the Appendix chapter).
When installing the clamp [A] on the rear fender front [B],
install it so that the clamp positions at near the ...
Exploded View
13. Front Wheel Rotation Sensor
B: Apply brake fluid.
L: Apply a non-permanent locking agent.
R: Replacement Parts
S: Follow the specified tightening sequence.
Si: Apply silicone grease (ex. PBC grease).
10. Rear Wheel Rotation Sensor
B: Apply brake fluid.
G: Apply gr ...
Subthrottle Sensor Output Voltage Inspection
Measure the output voltage at the subthrottle sensor in
the same way as input voltage inspection, note the following.
Disconnect the subthrottle sensor connector and connect
the setting adapter [A] between these connectors.
Special Tool - Throttle Sensor Setting Adapter: 57001
-1538
...
