
 : The fuel level warning
indicators
are activated when approximately 3.8 L
(1.0 US gal) of fuel remains as follows:
For models without KIBS:
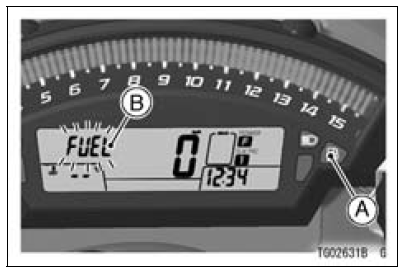
A. Fuel Level Warning Indicator Light
B. тАЬFUELтАЭ Indication
The fuel level warning indicator light
(  ) goes
on and тАЬFUELтАЭ blinks in the
multifunction display.
For models equipped with KIBS:
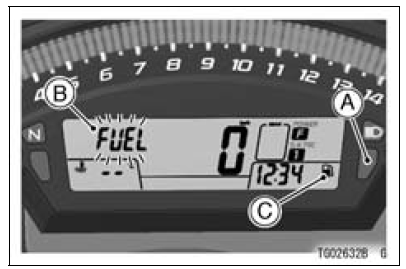
A. Warning Indicator Light (Yellow)
B. тАЬFUELтАЭ Indication
C. Warning Symbol (
 )
)
The yellow warning indicator light and
warning symbol ( 
) goes on, and
тАЬFUELтАЭ blinks in the multifunction display.
Refuel at the earliest opportunity when the fuel level warning indicator light goes on and тАЬFUELтАЭ blinks.
When vehicle stands with side stand, the fuel level warning indicator light cannot show the amount of fuel in the fuel tank exactly. Stand upright the vehicle to check the fuel level.
NOTE
When pushing the upper button while тАЬFUELтАЭ is displayed, the multifunction display can be shifted to odometer mode.
 ABS Indicator Light (For models equipped with KIBS)
 Warning Indicator Light (Red)
Special Tools
Inside Circlip Pliers:
57001-143
Oil Seal & Bearing Remover:
57001-1058
Bearing Driver Set:
57001-1129
Jack:
57001-1238
Bearing Remover Head, 15 ×
17:
57001-1267
Fork Oil Level Gauge:
57001-1290
Bearing Remover Shaft, 13:
57001-1377
Fork Oil Seal Driver, 43:
57001-15 ...
Balance Adjustment
If the wheel always stops in one position, provisionally
attach a balance weight [A] on the rim at the marking using
adhesive tape.
Rotate the wheel 1/4 turn [B], and see whether or not the
wheel stops in this position. If it does, the correct balance
weight is being used.
If the whe ...
Coolant Flow Chart
1. Radiator
2. Radiator Fan
3. Water Pump
4. Oil Cooler
5. Oil Cooler Intake Hose
6. Oil Cooler Outlet Hose
7. Cylinder Jacket
8. Cylinder Head Jacket
9. Thermostat Housing
10. Air Bleeder Hose
11. Radiator Cap
12. Radiator Overflow Hose
13. Reserve Tank
14. Reserve Tank Overflow Ho ...