
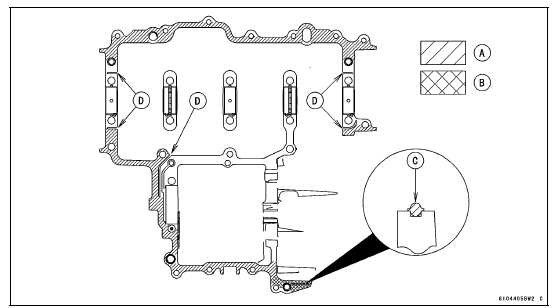
Sealant - Liquid Gasket, TB1216B [A]: 92104-1064 Liquid Gasket, TB1207B [B]: 92104-2068
NOTE
NOTICE
Do not apply liquid gasket around the crankshaft main bearing inserts and oil passage.
NOTE
Install the drive shaft bearing [A].
Special Tool - Bearing Driver Set: 57001-1129
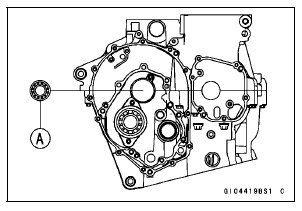
Face the oil seal side of the bearing to the bottom.
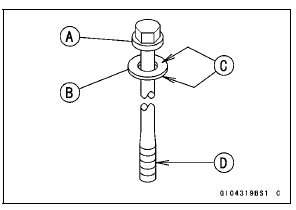
Install the M9 bolts and washers.
L = 113 mm (4.45 in.) [A] L = 100 mm (3.94 in.) [B]
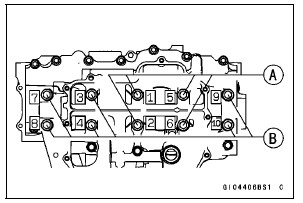
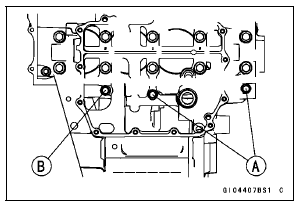
Tighten M9 bolts by following the sequence numbers [1

10].
Torque - Lower Crankcase Bolts (M9): 45 N·m (4.6 kgf·m, 33 ft·lb)
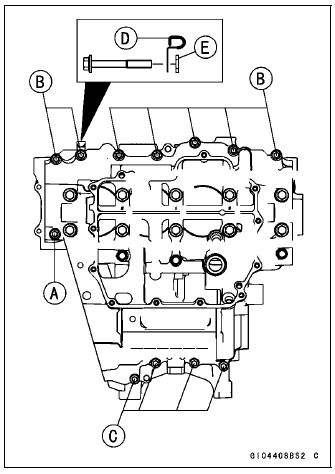
Install the M7 bolts.
L = 50 mm (2.0 in.) [A] L = 45 mm (1.8 in.) [B] Tighten:
Torque - Lower Crankcase Bolts (M7): 20 N·m (2.0 kgf·m, 15 ft·lb)
Replace the M6 bolt washers with new ones.
Install the M6 bolts.
L = 60 mm (2.4 in.) [A] (With Washer) L = 45 mm (1.8 in.) [B] L = 40 mm (1.6 in.) [C]
Install the clamp [D] and washer [E] as shown in the figure.
Tighten:
Torque - Lower Crankcase Bolts (M6): 12 N·m (1.2 kgf·m, 106 in·lb)
Replace the M8 bolt washers with new ones.
Install the M8 bolts [A] and washers.
Install the M7 bolt [B].
Tighten:
Torque - Upper Crankcase Bolts (M8): 27 N·m (2.8 kgf·m, 20 ft·lb) Upper Crankcase Bolt (M7): 20 N·m (2.0 kgf·m, 15 ft·lb)
Wipe up the liquid gasket that seeps out around the crankcase mating surface.
Crankshaft turns freely.
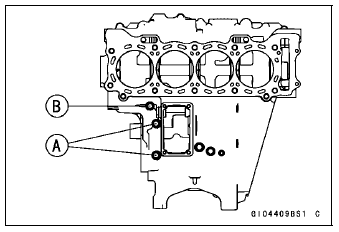
Drive Shaft Bearing Holder [A] Output Shaft Bearing Holder [B]

Turn the flat side [C] of the holders to inside.
 Lower Crankcase Assembly
Keys
This motorcycle has a combination
key, which is used for the ignition
switch, steering lock, seat lock, and
fuel tank cap.
Included with the key is a key number,
which may be stamped on a separate
plate. Record the key number in
the space provided and store the number
in a safe place. If y ...
Check 3-5: Warning Indicator Light (Red LED) (Oil Pressure Warning)
Inspection
Connect the leads in the same circuit as Check 3-2.
Connect the terminal [10] to the battery (–) terminal.
Check that the oil pressure warning symbol [A] and the
warning indicator light (Red LED) [B] go on.
If the indicator light does not go on, replace the meter unit.
...
Exhaust Butterfly Valve Cable Removal
Remove the fuel tank (see Fuel Tank Removal in the Fuel
System (DFI) chapter).
Open the clamp [A] and free the cables.
Slide the dust covers [B].
Loosen the locknuts [A], and turn the adjusters [B] to give
the cable plenty of play.
Remove the clamp [A].
Remove the up ...
