
Torque - Timing Rotor Bolt: 39 N·m (4.0 kgf·m, 29 ft·lb) Special Tool - Flywheel & Pulley Holder: 57001-1605

 Timing Rotor Removal
 Stick Coil Removal
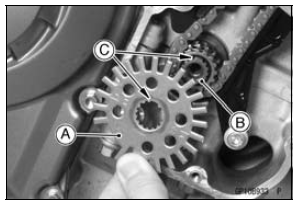
Oil Pump Drive Gear Installation
Install is the reverse of removal. Note the following.
First, engage the oil pump chain [A] to the gears, and then
install the oil pump drive gear [B].
Turn the “OUT” mark [C] to outside.
Apply a non-permanent locking agent to the oil pump drive
chain guide bolt and the oil pump drive ...
Engine Installation
Apply molybdenum disulfide grease to the threads of the
adjusting collars [A].
Install the adjusting collars to crankcase backside until
end of the threads.
Install the adjusting collar [A] to the frame until end of the
threads.
Replace the engine mounting nuts with ne ...
Starter Clutch Assembly
Install the one-way clutch [A] to the driven gear.
Face the circlip side of the one-way clutch to inside.
Install the new snap ring [B] to the one-way clutch.
Install the drive gear [C] while turn it counterclockwise [D].
Apply molybdenum disulfide oil solution to the needle
bearing ...