
 : Normally
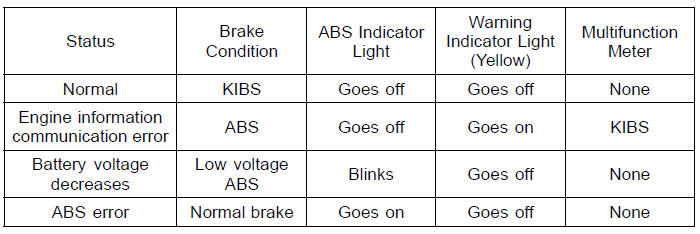
the ABS indicator light goes on when the ignition switch is turned
“ON” and goes off shortly after the motorcycle starts moving. If the ABS is
normal,
it stays off. If the ABS indicator light shows any of the following, a fault or
faults may
have taken place in the ABS. You should have the ABS checked by an authorized
Kawasaki dealer.
Remember that the ABS does not function when the indicator light is on. If the ABS fails, the front and rear brakes work normally as a conventional brake system.
NOTE
 Electronic Steering Damper Warning Indicator Light
 Fuel Level Warning Indicator Light
Clock
To adjust hours and minutes, do the
followings while the motorcycle is at a
stop.
Turn the ignition switch to “ON”.
Display the odometer in the multifunction
display. Refer to the “Multifunction
Display” item in this section.
Push the lower button for more than
2 seconds. Bot ...
Throttle Body Assy Installation
Apply a thin coat of grease to the throttle cable lower ends.
Fit the accelerator cable end [A] and the decelerator cable
end [B] into the throttle pulley.
Install the clamp [C] securely.
Install the throttle body assy holder clamp bolt heads [A]
outside as shown in the figure.
...
Starter Motor Disassembly
Remove the starter motor (see Starter Motor Removal).
Take off the starter motor through bolts [A] and remove
the both end covers [B].
Pull out the armature [A] out of the yoke [B].
NOTE
Do not remove the circlip [C] from the shaft.
Remove the starter motor terminal lock ...