
 : The fuel level warning
indicators
are activated when approximately 3.8 L
(1.0 US gal) of fuel remains as follows:
For models without KIBS:
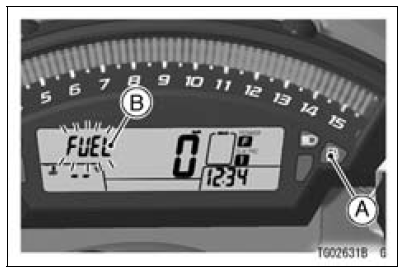
A. Fuel Level Warning Indicator Light
B. “FUEL” Indication
The fuel level warning indicator light
(  ) goes
on and “FUEL” blinks in the
multifunction display.
For models equipped with KIBS:
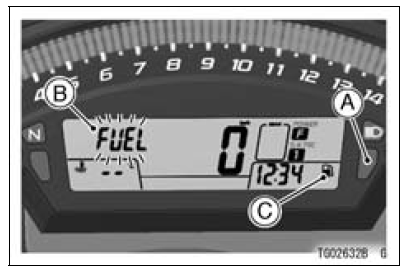
A. Warning Indicator Light (Yellow)
B. “FUEL” Indication
C. Warning Symbol (
 )
)
The yellow warning indicator light and
warning symbol ( 
) goes on, and
“FUEL” blinks in the multifunction display.
Refuel at the earliest opportunity when the fuel level warning indicator light goes on and “FUEL” blinks.
When vehicle stands with side stand, the fuel level warning indicator light cannot show the amount of fuel in the fuel tank exactly. Stand upright the vehicle to check the fuel level.
NOTE
When pushing the upper button while “FUEL” is displayed, the multifunction display can be shifted to odometer mode.
 ABS Indicator Light (For models equipped with KIBS)
 Warning Indicator Light (Red)
Valve Seat Inspection
Remove the valve (see Valve Removal).
Check the valve seating surface [A] between the valve [B]
and valve seat [C].
Measure the outside diameter [D] of the seating pattern
on the valve seat.
If the outside diameter is too large or too small, repair the
seat (see Valve Seat Repair).
Val ...
Key Registration
Case 1: When the ignition key has been lost or additional
spare ignition key is required.
Prepare a new spare ignition key.
Cut the key in accordance with the shape of the current
ignition key.
Remove the rear seat (see Rear Seat Removal in the
Frame chapter).
Remove the immobilizer/K ...
KIBS Equipped Models
1. Clutch Cable
2. Vacuum Hose (Equipped Models)
3. Left Switch Housing Lead
4. Main Harness
5. Front Brake Hose
6. Throttle Cables
7. Right Switch Housing Lead
8. Bracket (Hold the brake pipes.)
9. Run the meter lead to outside of the meter bracket.
10. Run the vacuum hoses to inside o ...