
NOTE
Be sure the battery is fully charged.
Do not disconnect the connectors.
Special Tool - Needle Adapter Set: 57001-1457
Amplifier Input Voltage Connections to Amplifier Connector: Digital Meter (+) → BR/W lead Digital Meter (–) → BK/Y lead
If the reading is out of the standard, check the wiring (see Immobilizer System Circuit).
If the reading is within the standard, check the wiring to ECU (see Immobilizer System Circuit)
If the wiring is good, replace the amplifier (see Immobilizer System Parts Replacement in the Electrical System chapter).
The transponder [A] in the ignition key is malfunction.
When the spare key of unregistration is used.
When the ignition key is registered in the registered ECU.
 Antenna Resistance Inspection
 Blank Key Detection (Service Code 36, Equipped Models)
Overview
S-KTRC is a highly sophisticated system based on MotoGP racing technology.
Unlike the KTRC
system used on the GTR1400 ABS (Concours 14 ABS in N. America), which is
designed to offer rider
reassurance when traversing slippery surfaces, S-KTRC, is designed to maximize
forward motion,
allowing ...
Intake Air Temperature Sensor Removal
NOTICE
Never drop the intake air temperature sensor especially
on a hard surface. Such a shock to the sensor
can damage it.
Remove the fuel tank (see Fuel Tank Removal in the Fuel
System (DFI) chapter).
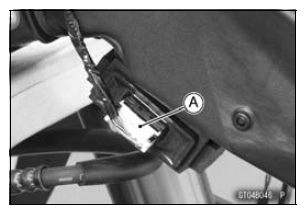
Disconnect the connector [A] from the intake air temperature
sensor.
Remove the da ...
Oxygen Sensor - not activated (Service Code 33, Equipped Models)
Oxygen Sensor Removal/Installation
Refer to the Oxygen Sensor Removal/Installation
(Equipped Models) in the Electrical System chapter.
Oxygen Sensor Inspection
Remove:
Fuel Tank (see Fuel Tank Removal in the Fuel System
(DFI) chapter)
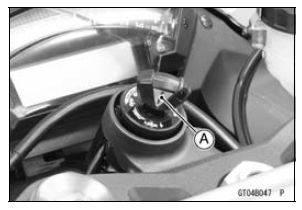
Oxygen Sensor Lead Connector [A]
Connect t ...