
The brake fluid has a very low compression coefficient so that almost all the movement of the brake lever or pedal is transmitted directly to the caliper for braking action. Air, however, is easily compressed. When air enters the brake lines, brake lever or pedal movement will be partially used in compressing the air. This will make the lever or pedal feel spongy, and there will be a loss in braking power.
| WARNING Air in the brake lines diminish braking performance and can cause an accident resulting in injury or death. If the brake lever or pedal has a soft or "spongy" feeling mushy when it is applied, there might be air in the brake lines or the brake may be defective. Do not operate the vehicle and service the brake system immediately. |
NOTE
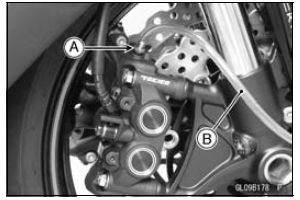
The procedure to bleed the front brake line is as follows.
Bleeding the rear brake line is the same as for the front brake.


Repeat this operation until no more air can be seen coming out into the plastic hose.
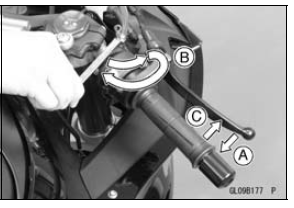
1. Pump the brake lever until it becomes hard, and apply the brake and hold it [A].
2. Quickly open and close [B] the bleed valve while holding the brake applied.
3. Release the brake [C].

NOTE
The fluid level must be checked often during the bleeding operation and replenished with fresh brake fluid as necessary. If the fluid in the reservoir runs completely out any time during bleeding, the bleeding operation must be done over again from the beginning since air will have entered the line.
Torque - Front Master Cylinder Bleed Valve: 5.4 N·m (0.55 kgf·m, 48 in·lb)

Repeat this operation until no more air can be seen coming out into the plastic hose.
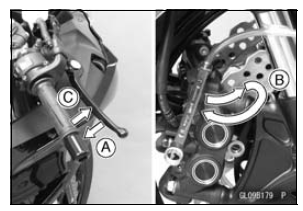
1. Pump the brake lever until it becomes hard, and apply the brake and hold it [A].
2. Quickly open and close [B] the bleed valve while holding the brake applied.
3. Release the brake [C].

NOTE
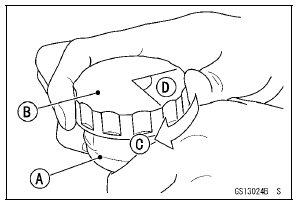
First, tighten the brake fluid reservoir cap [B] clockwise [C] by hand until slight resistance is felt indicating that the cap is seated on the reservoir body, then tighten the cap an additional 1/6 turn [D] while holding the brake fluid reservoir body [A].

Torque - Bleed Valves: 7.8 N·m (0.80 kgf·m, 69 in·lb)
| WARNING When working with the disc brake, observe the precautions listed below.
|
 Brake Fluid Level Inspection
 Brake Hose
Ignition Switch Replacement
Remove:
Air Cleaner Housing (see Air Cleaner Housing Removal
in the Fuel System (DFI) chapter)
Disconnect the lead connectors [A].
Remove:
Steering Stem Head (see Stem, Stem Bearing Removal
in the Steering chapter)
Using a small chisel or punch [A], turn out the Torx bolts.
...
Mode-switching
Depress the S-KTRC button on the left handlebar switch
to change the mode. The mode can be changed only when
the throttle grip is closed completely.
The S-KTRC OFF can be selected only when the motorcycle
is at a stop. Changing to mode 1 from S-KTRC OFF
is possible while riding.
NOTE
...
Rear Wheel Rotation Sensor Wiring Inspection (Service Code b 45)
Disconnect the rear wheel rotation sensor lead connector
[A] (see Rear Wheel Rotation Sensor Removal in the
Brakes chapter).
Disconnect the KIBS hydraulic unit lead connector (see
KIBS Hydraulic Unit Removal in the Brakes chapter).
Check the wiring continuity of the G lead and R ...