Kawasaki Ninja Service Manual: Caliper Rubber Parts Replacement
Front Caliper Disassembly
- Remove:
Front Caliper (see Front Caliper Removal in the Brakes
chapter)
Brake Pads (see Front Brake Pad Removal in the Brakes
chapter)
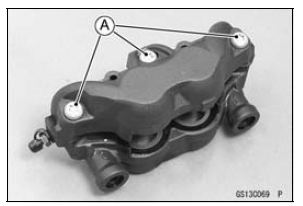
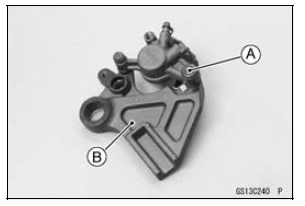
- Remove:
Front Caliper Assembly Bolts [A]
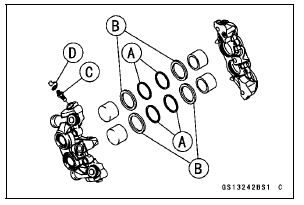
- Split the front caliper.
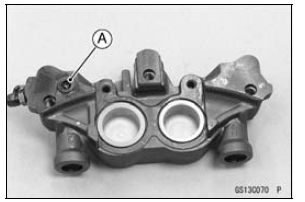
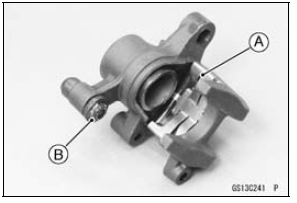
- Remove:
Pad Spring
O-ring [A]
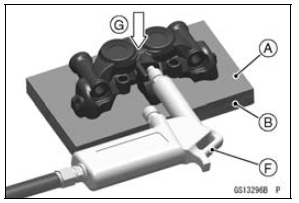
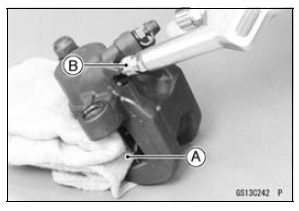
- Using compressed air, remove the pistons. One way to
remove the pistons is as follows.
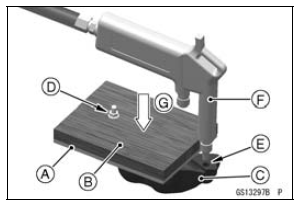
Install a rubber gasket [A] and a wooden board [B] more
than 10 mm (0.4 in.) thick on the caliper half.
For inside caliper half [C], fasten them together with a
suitable bolt and nut [D] as shown. Leave one of the oil
passage [E] open.
Lightly apply compressed air [F] to the oil passage until
the pistons hit the rubber gasket.
Push down [G]
| WARNING The piston in the brake caliper can crush
hands and
fingers. Never place your hand or fingers in front of
the piston. |
Pull out the pistons by hand.
- Remove the dust seals [A] and fluid seals [B].
- Remove the bleed valve [C] and rubber cap [D].
- Repeat the previous step to remove the pistons from the
other side of the caliper body.
NOTE
- If compressed air is not available, do as follows for both
calipers coincidentally, with the brake hose connected
to the caliper.
- Prepare a container for brake fluid, and perform the
work above it.
- Remove the pad springs and pads (see Front Brake
Pad Removal in the Brakes chapter).
- Pump the brake lever until the pistons come out of the
cylinders, and then disassemble the caliper.
Front Caliper Assembly
- Clean the caliper parts except for the pads.
NOTICE
For cleaning the parts, use only disc brake fluid,
isopropyl alcohol, or ethyl alcohol.
- Install the bleed valve and rubber cap.
Torque - Bleed Valves: 7.8 N·m (0.80 kgf·m, 69 in·lb)
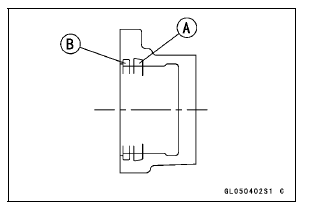
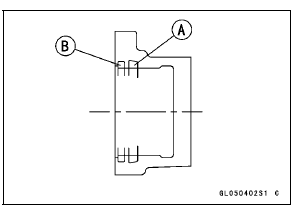
- Replace the fluid seals [A] with new ones.
Apply silicone grease to the fluid seals, and install them
into the cylinders by hand.
- Replace the dust seals [B] with new ones.
Apply silicone grease to the dust seals, and install them
into the cylinders by hand.
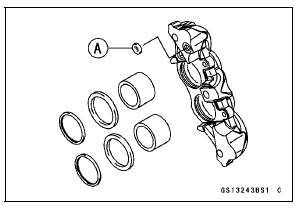
- Replace the O-ring [A] and install it.
- Apply brake fluid to the outside of the pistons, and push
them into each cylinder by hand.
- Be sure to install the O-ring.
- Tighten:
Torque - Front Caliper Assembly Bolts: 22 N·m (2.2 kgf·m,
16 ft·lb)
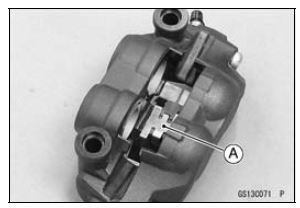
- Install the pad spring [A] as shown.
- Install the brake pads (see Front Brake Pad Installation in
the Brakes chapter).
- Wipe up any spilled brake fluid on the caliper with wet
cloth.
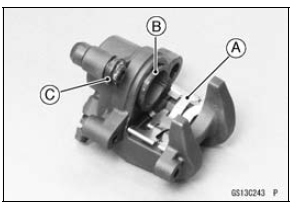
Rear Caliper Disassembly
- Remove:
Rear Caliper (see Rear Caliper Removal in the Brakes
chapter)
Brake Pads (see Rear Brake Pad Removal in the Brakes
chapter)
Bolt [A]
Caliper Bracket [B]
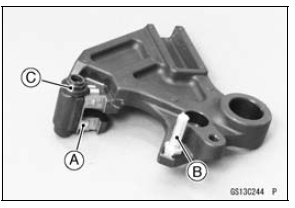
- Remove:
Pad Spring [A]
Dust Boot [B]
- Using compressed air, remove the piston.
Cover the caliper opening with a clean, heavy cloth [A].
Remove the piston by lightly applying compressed air [B]
to where the brake line fits into the caliper.
| WARNING The piston in the brake caliper can crush
hands and
fingers. Never place your hand or fingers in front of
the piston. |
- Remove the dust seal and fluid seal.
- Remove the bleed valve and rubber cap.
NOTE
- If compressed air is not available, do as follows with the
brake hose connected to the caliper.
- Prepare a container for brake fluid, and perform the
work above it.
- Remove the pads (see Rear Brake Pad Removal in the
Brakes chapter).
- Pump the brake pedal to remove the caliper piston.
Rear Caliper Assembly
- Clean the caliper parts except for the pads.
NOTICE
For cleaning the parts, use only disc brake fluid,
isopropyl alcohol, or ethyl alcohol.
- Install the bleed valve and rubber cap.
Torque - Bleed Valves: 7.8 N·m (0.80 kgf·m, 69 in·lb)
- Replace the fluid seal [A] with a new one.
Apply silicone grease to the fluid seal, and install it into
the cylinder by hand.
- Replace the dust seal [B] with a new one.
Apply silicone grease to the dust seal, and install it into
the cylinder by hand.
- Install the pad spring [A] in the caliper as shown in the
figure.
- Apply brake fluid to the outside of the piston [B], and push
it into the cylinder by hand.
- Replace the and dust boot [C].
- Install the pad spring [A] on the caliper bracket as shown
in the figure.
- Apply a silicone grease to the caliper bracket shaft [B].
- Replace the friction boot [C].
- Assemble the caliper and the caliper bracket.
- Apply silicone grease to the rear caliper pin bolt.
- Tighten:
Torque - Rear Caliper Pin Bolt: 27 N·m (2.8 kgf·m, 20 ft·lb)
- Install the pads (see Rear Brake Pad Installation in the
Brakes chapter).
- Wipe up any spilled brake fluid on the caliper with wet
cloth.
Front Master Cylinder Disassembly
Remove the front master cylinder (see Front Master Cylinder
Removal in the Brakes chapter).
Remove the seal cover [A], circlip [B], connector [C] and
O-ring ...
Remove the stick coils (see Stick Coil Removal in the
Electrical System chapter).
Remove the spark plugs using the 16 mm (0.63 in.) plug
wrench [A] vertically.
Replace the spark plug with n ...
Other materials:
Main Throttle Sensor Input Voltage Inspection
NOTE
Be sure the battery is fully charged.
Turn the ignition switch to OFF.
Remove the throttle body assy (see Throttle Body Assy
Removal in the Fuel System (DFI) chapter).
Do not disconnect the connectors of the throttle body
assy.
Disconnect the main throttle sensor connector ...
Battery Ground
Before completing any service on the motorcycle, disconnect
the battery cables from the battery to prevent the engine
from accidentally turning over. Disconnect the ground
cable (–) first and then the positive (+). When completed
with the service, first connect the positive (+) cable to the
p ...
IC Igniter Inspection
The IC igniter is built in the ECU [A].
Refer to the following items.
Interlock Operation Inspection (see Interlock Operation
Inspection)
Ignition System Troubleshooting (see Ignition System
section)
ECU Power Supply Inspection (see ECU Power Supply
Inspection in the Fuel System (D ...

 Master Cylinder Rubber Parts Replacement
 Spark Plug Replacement