
If the clearance exceeds the service limit, replace the thrust washers as a set and check the width of the crankshaft #3 main journal.
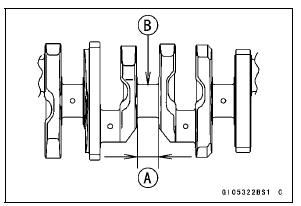
Crankshaft Side Clearance
Standard: 0.05  0.25 mm
(0.0020  0.0098 in.)
Service Limit: 0.45 mm (0.0177 in.)
If the measurement exceeds the standard, replace the crankshaft.
Crankshaft #3 Main Journal Width
Standard: 23.49  23.54 mm (0.9248
 0.9268 in.)
 Connecting Rod Big End
Bearing Insert/Crankpin Wear Inspection
Connecting Rod Big End
Bearing Insert/Crankpin Wear Inspection Crankshaft Runout Inspection
Compression Damping Force Adjustment
There are two adjustments you can make to the compression
damping force.
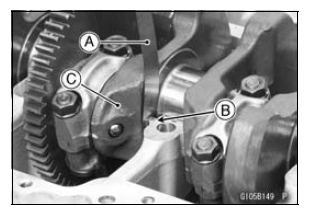
High Speed Compression Damping Adjuster [A]
Low Speed Compression Damping Adjuster [B]
To adjust the high speed compression damping force, turn
the outside damping adjuster with a wrench to the desired
position ...
Oil Level Inspection
If the oil has just been changed, start
the engine and run it for severalminutes
at idle speed. This fills the oil
filter with oil. Stop the engine, then
wait several minutes until the oil settles.
NOTICE
Racing the engine before the oil
reaches every part can cause engine
seizure.
...
Chain Slack Inspection
Set the motorcycle up on its side
stand.
Rotate the rear wheel to find the position
where the chain is tightest, and
measure the maximum chain slack
by pulling up and pushing down the
chain midway between the engine
sprocket and rear wheel sprocket.
A. Chain Slack
If the ...