
NOTE
Be sure the transmission and external shift mechanism are good condition.
When changing the gear position from lower gear to higher gear, raise the rear wheel off the ground with the stand and rotate the rear wheel by hand.
Internal Circuit [C]
[1] LG Lead [2] G/R Lead [3] BK Lead
Special Tool - Hand Tester: 57001-1394
Gear Position Switch Resistance
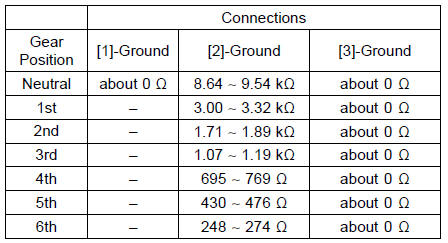
If the tester reading is not as specified, replace the gear position switch with a new one.
 Gear Position Switch Installation
 Relay Box
Key Registration
Case 1: When the ignition key has been lost or additional
spare ignition key is required.
Prepare a new spare ignition key.
Cut the key in accordance with the shape of the current
ignition key.
Remove the rear seat (see Rear Seat Removal in the
Frame chapter).
Remove the immobilizer/K ...
Water Temperature Sensor Output Voltage Inspection
NOTE
Be sure the battery is fully charged.
Turn the ignition switch to OFF.
Remove the throttle body assy (see Throttle Body Assy
Removal in the Fuel System (DFI) chapter).
Disconnect the water temperature sensor connector and
connect the measuring adapter [A] between these connectors
...
Model Identification
ZX1000JB (US and CA Models) Left Side View
ZX1000JB (US and CA Models) Right Side View
ZX1000JB (EUR Models) Left Side View
ZX1000JB (EUR Models) Right Side View
ZX1000KB (US and CA Models) Left Side View
ZX1000KB (US and CA Models) Right Side View
ZX1000KB (EUR Models) ...