
NOTE
The camshaft cap is machined with the cylinder head, so if a new cylinder head is installed, use the cap that is supplied with the new head.

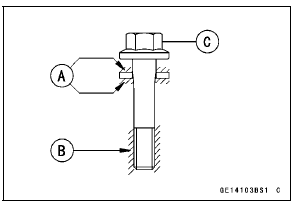
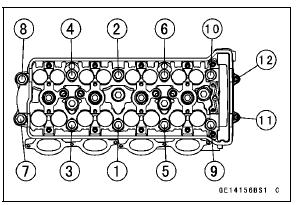
Torque - Cylinder Head Bolts (M10): First: 20 N·m (2.0 kgf·m, 15 ft·lb) Final: 45 N·m (4.6 kgf·m, 33 ft·lb)
Torque - Cylinder Head Bolts (M6): 12 N·m (1.2 kgf·m, 106 in·lb)

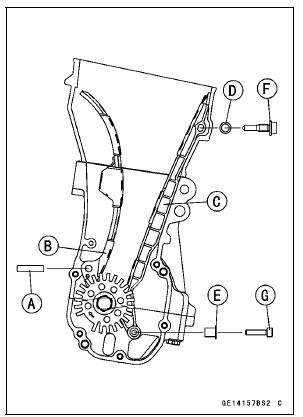
Torque - Front Camshaft Chain Guide Bolt (Upper) [F]: 25 N·m (2.5 kgf·m, 18 ft·lb) Front Camshaft Chain Guide Bolt (Lower) [G]: 12 N·m (1.2 kgf·m, 106 in·lb)

 Cylinder Head Removal
 Cylinder Head Warp Inspection
Fuel Tank Cleaning
WARNINGGasoline and low flash-point solvents can
be
flammable and/or explosive and cause severe
burns. Clean the tank in a well-ventilated area, and
take care that there are no sparks or flame anywhere
near the working area. Do not use gasoline
or low flash-point solvents t ...
Drive Chain Lubrication Condition Inspection
If a special lubricant is not available, a heavy oil such as
SAE 90 is preferred to a lighter oil because it will stay on
the chain longer and provide better lubrication.
If the chain appears especially dirty, clean it before lubrication.
NOTICE
The O-rings between the side plates seal ...
Throttle Grip and Cables
Free Play Inspection
Refer to the Throttle Control System Inspection in the Periodic
Maintenance chapter.
Free Play Adjustment
Refer to the Throttle Control System Inspection in the Periodic
Maintenance chapter.
Cable Installation
Install the throttle cables in accordance with the Cable,
...