
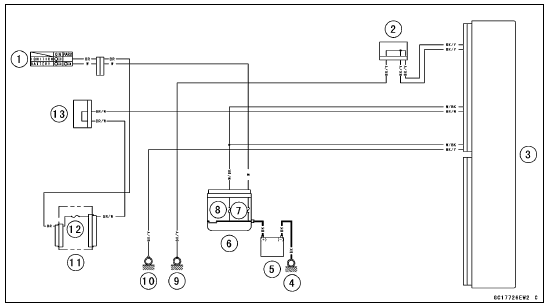
1. Ignition Switch
2. Joint Connector E
3. ECU
4. Engine Ground
5. Battery
6. Starter Relay
7. Main Fuse 30 A
8. ECU Fuse 15 A
9. Frame Ground 2
10. Frame Ground 1
11. Fuse Box 1
12. Ignition Fuse 15 A
13. Joint Connector F
 ECU Power Supply Inspection
 CAN Communication Line
Starter Clutch Removal
Remove:
Torque Limiter (see Torque Limiter Removal)
Transmission Assy (see Transmission Assy Removal)
Starter Clutch Shaft Holder Bolt [A]
Starter Clutch Shaft Bolt [B]
Starter Clutch Shaft Holder [C]
Remove the starter clutch shaft [A] using a suitable M8
bolt [B].
Take ...
DFI System
1. ECU
2. Battery
3. Vehicle-down Sensor
4. Exhaust Butterfly Valve Actuator
5. Vacuum Chamber (Other than US, CA and CAL Models)
6. Air Intake Valve Actuator (Other than US, CA and CAL Models)
7. Air Intake Valve (Other than US, CA and CAL Models)
8. Air Flow
9. Air Intake Solenoid Valve ...
Master Cylinder Rubber Parts Replacement
Front Master Cylinder Disassembly
Remove the front master cylinder (see Front Master Cylinder
Removal in the Brakes chapter).
Remove the seal cover [A], circlip [B], connector [C] and
O-ring [D].
Special Tool - Inside Circlip Pliers: 57001-143
Unscrew the locknut [E] and pivot bolt ...