
ESD Actuator Resistance
Connections: BK lead [1] ←→ O lead [3]
R lead [2] ←→Y lead [4]
Standard: About 23  29 Ω
29 Ω
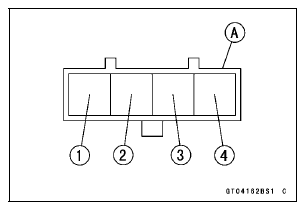
If the reading is out of the standard, replace the electronic steering damper unit.
If the reading is within the standard, check the input voltage (see Idle ESD Actuator Input Voltage Inspection).
 ESD Actuator Removal
 ESD Actuator Input Voltage Inspection
System Components
1. FI ECU
The FI ECU analyzes the motorcycle conditions based
on the signals from the front/rear wheel rotation sensors
and FI sensors (such as the crankshaft sensor and main
throttle sensor), and controls engine power by reducing the
number of ignition and retarding the ignition timing. The
m ...
Air Suction Valve Installation
Install the air suction valve so that opening [A] of the reed
faces downward.
Apply a non-permanent locking agent to the threads of
the air suction valve cover bolts [A], and tighten them.
Torque - Air Suction Valve Cover Bolts: 9.8 N·m (1.0 kgf·m,
87 in·lb)
...
Check 3-5: Warning Indicator Light (Red LED) (Oil Pressure Warning)
Inspection
Connect the leads in the same circuit as Check 3-2.
Connect the terminal [10] to the battery (–) terminal.
Check that the oil pressure warning symbol [A] and the
warning indicator light (Red LED) [B] go on.
If the indicator light does not go on, replace the meter unit.
...