
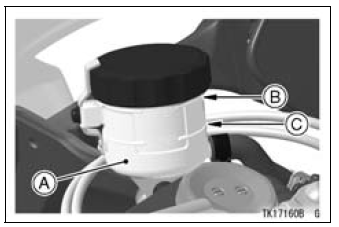
A. Front Brake Fluid Reservoir
B. Upper Level Line
C. Lower Level Line
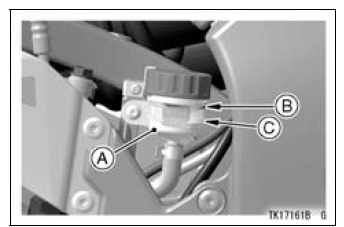
A. Rear Brake Fluid Reservoir
B. Upper Level Line
C. Lower Level Line
| WARNING Mixing brands and types of brake fluid can reduce the brake system’s effectiveness and cause an accident resulting in injury or death. Do not mix two brands of brake fluid. Change the brake fluid in the brake line completely if the brake fluid must be refilled but the type and brand of the brake fluid that is already in the reservoir are unidentified. |
NOTE
First, tighten until slight resistance is felt, which indicates that the cap is seated on the reservoir body, and tighten the cap an additional 1/6 turn while holding the brake fluid reservoir body.
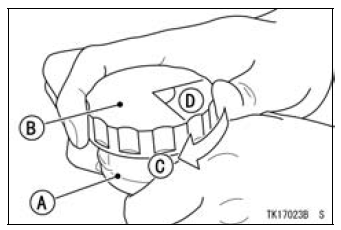
A. Reservoir
B. Cap
C. Clockwise
D. 1/6 turn
Fluid Change
Have the brake fluid changed by an authorized Kawasaki dealer.
 Fluid Requirement
 Front and Rear Brakes
Fuel Injector Audible Inspection
NOTE
Be sure the battery is fully charged.
The secondary fuel injectors are operating with following
conditions.
1. The engine speed is more than 6 000 r/min (rpm).
2. The throttle opening is more than 12°.
Remove:
Fuel Tank (see Fuel Tank Removal)
Primary Fuel Hose (see Fuel ...
Gear Position Indicator
The gear position indicator shows the
corresponding gear positions where
the transmission is shifted.
For example, when the transmission
is in 6th gear, “6” is displayed.
A. Gear Position Indicator (Normal mode)
NOTE
If the gear position is in the neutral
position, the gear positio ...
Balancer Removal
Remove:
Engine (see Engine Removal in the Engine Removal/Installation
chapter)
Oil Pan (see Oil Pan Removal in the Engine Lubrication
System chapter)
Remove:
Balancer Shaft Clamp Lever Bolt [A]
Balancer Shaft Clamp Bolt [B]
Balancer Shaft Clamp Lever [C]
Balancer Shaft [D]
Bal ...