
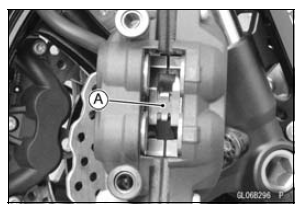
Fit the pad into the groove of the caliper as shown in the figure.
| WARNING After servicing, it takes several applications of the brake lever before the brake pads contact the disc, which could result in increased stopping distance and cause an accident resulting in injury or death. Do not attempt to ride the motorcycle until a firm brake lever is obtained by pumping the lever until the pads are against the disc. |
 Front Brake Pad Removal
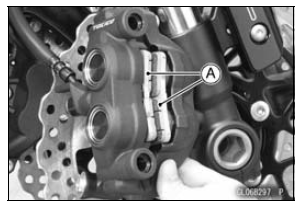
 Rear Brake Pad Removal
Rebound Damping Force Adjustment
To adjust the rebound damping force, turn the rebound
damping adjuster [A].
The standard adjuster setting is the 3 3/4 turns out from
the fully clockwise position.
WARNINGIf both adjusters are not adjusted
equally, handling
may be impaired and a hazardous condition may
res ...
Subthrottle Valve Actuator Input Voltage Inspection
NOTE
Be sure the battery is fully charged.
Turn the ignition switch to OFF.
Disconnect the subthrottle valve actuator connector and
connect the measuring adapter [A] between these connectors
as shown in the figure.
Main Harness [B]
Subthrottle Valve Actuator [C]
Special Tool ...
Stick Coil Removal
Remove the air cleaner housing (see Air Cleaner Housing
Removal in the Fuel System (DFI) chapter).
Disconnect the stick coil connectors [A].
Pull out the stick coils [B] upward.
First, turn the stick coil by 90 degrees, and then pull it out
by twisting the coil head to the left and righ ...