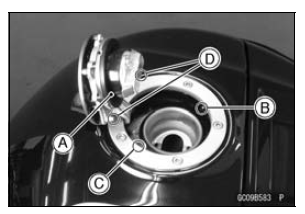

Replace the gasket if it is damaged.
If they are clogged, remove the tank and drain it, and then blow the breather free with compressed air.

NOTICE
Do not apply compressed air to the air vent holes [D] in the tank cap. This could cause damage and clogging of the labyrinth in the cap.
 Fuel Tank Installation
 Fuel Tank Cleaning
Wheel Alignment Inspection
Check that the notch [A] on the alignment indicator [B]
aligns with the same swingarm mark or position [C] that
the other side alignment indicator notch aligns with.
If they do not, adjust the chain slack and align the wheel
alignment (see Drive Chain Slack Adjustment).
NOTE
Wheel align ...
Starter Clutch Assembly
Install the one-way clutch [A] to the driven gear.
Face the circlip side of the one-way clutch to inside.
Install the new snap ring [B] to the one-way clutch.
Install the drive gear [C] while turn it counterclockwise [D].
Apply molybdenum disulfide oil solution to the needle
bearing ...
Special Tools
Bearing Puller:
57001-135
Head Pipe Outer Race Press Shaft:
57001-1075
Steering Stem Nut Wrench:
57001-1100
Bearing Driver Set:
57001-1129
Steering Stem Bearing Driver, 42.5:
57001-1344
Steering Stem Bearing Driver Adapter,
41.5:
57001-1345
Head Pipe Outer Race Driver, 55:
57001- ...