
NOTE
Do not turn the bolts because the reflector in the headlight comes off.
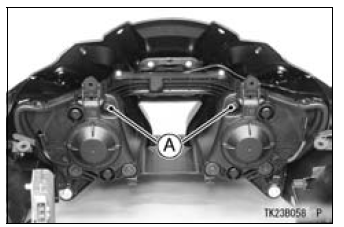
A. Bolts
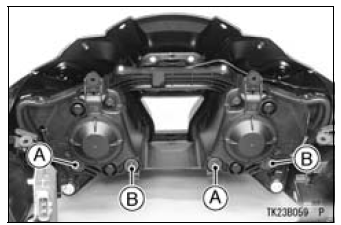
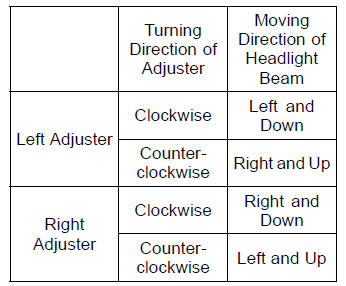
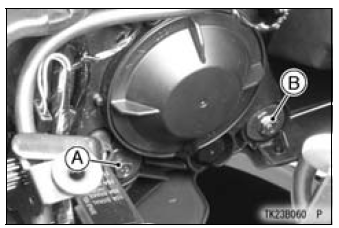
A. Left Adjuster
B. Right Adjuster
 To move the
headlight beam leftward,
turn the left adjuster clockwise
and turn the right adjuster counterclockwise
same number as the left
adjuster was turned until the beam
points straight ahead.
A. Left Adjuster
B. Right Adjuster
NOTE
On high beam, the brightest points should be slightly below horizontal.
The proper angle is 0.4 degrees below horizontal. This is a 50 mm (2.0 in.) drop at 7.6 m (25 ft) measured from the center of the headlight, with the motorcycle on its wheels and the rider seated.
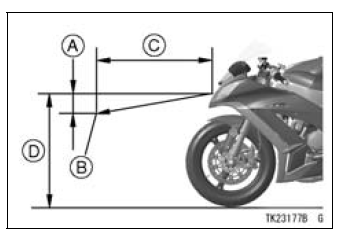
A. 50 mm (2.0 in.)
B. Center of Brightest Spot
C. 7.6 m (25 ft)
D. Height of Headlight Center
 Battery Installation
 Fuses
FusesAdditional Considerations for High Speed Operation
Brakes: The importance of the brakes, especially during high speed
operation,
cannot be overemphasized. Check to see that they are correctly adjusted and
functioning
properly.
Steering: Looseness in the steering can cause loss of control. Check to see that
the handlebar turns freely but ha ...
Torque and Locking Agent
The following tables list the tightening torque for the major fasteners
requiring use of a
non-permanent locking agent or silicone sealant etc.
Letters used in the “Remarks” column mean:
AL: Tighten the two clamp bolts alternately two times to ensure even tightening
torque.
G: Apply ...
Brakes
Brake Wear Inspection
Inspect the brakes for wear. For each
front and rear disc brake caliper, if the
thickness of either pad is less than
1 mm (0.04 in.), replace both pads
in the caliper as a set. Pad replacement
should be done by an authorized
Kawasaki dealer.
A. Lining Thickness
B. ...