
NOTE
Be sure the battery is fully charged.
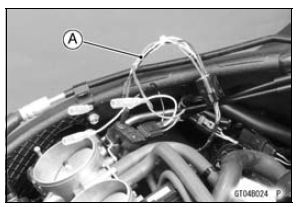
[B] Main Harness
[C] Intake Air Pressure Sensor #2
Special Tool - Measuring Adapter: 57001-1700
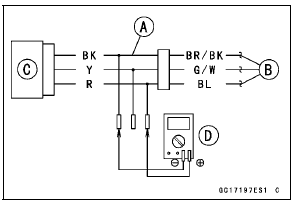
Intake Air Pressure Sensor #2 Input Voltage Connections to Adapter: Digital Meter (+) → R (sensor BL) lead
Digital Meter (–) → BK (sensor BR/BK) lead
Input Voltage Standard: DC 4.75 ∼ 5.25 V
If the reading is within the standard, check the output voltage (see Intake Air Pressure Sensor #2 Output Voltage Inspection).
If the reading is out of the standard, remove the ECU and check the wiring for continuity between main harness connectors.
Special Tool - Hand Tester: 57001-1394
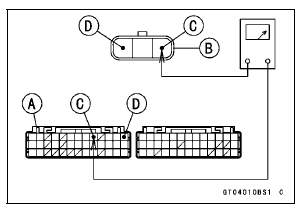
Disconnect the ECU and sensor connectors.
Wiring Continuity Inspection ECU Connector [A] ←→ Intake Air Pressure Sensor #2 Connector [B] BL lead (ECU terminal 9) [C] BR/BK lead (ECU terminal 13) [D]
If the wiring is good, check the ECU for its ground and power supply (see ECU Power Supply Inspection in the Fuel System (DFI) chapter).
If the ground and power supply are good, replace the ECU (see ECU Removal/Installation in the Fuel System (DFI) chapter).
 Intake Air Pressure Sensor #2 Installation
 Intake Air Pressure Sensor #2 Output Voltage Inspection
ABS and KIBS Indicator Lights (LED) Inspection
In this model, the ABS indicator light (LED) [A] and KIBS
indicator light (LED) [B] go on or blink by the data sent
from the KIBS hydraulic unit.
Refer to the Meter Unit Inspection in the Electrical System
chapter.
ABS and KIBS Indicator Lights (LED) Function
*: The mode of “Low ...
Service Code Reading
The service code(s) is displayed on the LCD by the number
of two digits.
NOTE
The service code of the KIBS and ABS adds “b” at the
left side of the code.
The service code of the ESD adds “E” at the left side of
the code.
When there are a number of problems, all the serv ...
Steering Play Adjustment
Remove:
Steering Stem Head with Handlebars (see Handlebar
Removal in the Steering chapter).
Bend the claws [A] of the claw washer [B] straighten.
Remove:
Steering Stem Locknut [C]
Claw Washer
Adjust the steering using the steering stem nut wrench
[A].
Special Tool - Ste ...