
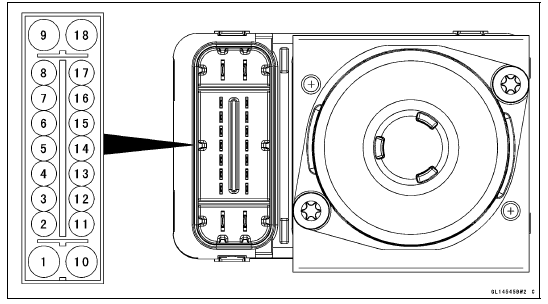
1. Ground: BK
2. CAN Communication Line (High): GY/BL
3. Front Wheel Rotation Sensor Signal Input: Y
4. Power Supply: BR/W
5. KIBS Kawasaki Self-Daignosis System Terminal: P
6. Front and Rear Brake Light Switch Signal: BL/R
7. Unused
8. Front Wheel Rotation Sensor Signal Output: G/Y
9. Power Supply to ABS Solenoid Valve Relay: R/BK
10. Ground to Motor: BK
11. CAN Communication Line (Low): LB
12. Power Supply to Front Wheel Rotation Sensor: W
13. Power Supply to Rear Wheel Rotation Sensor: R
14. Rear Wheel Rotation Sensor Signal Input: G
15. Unused
16. Rear Wheel Rotation Sensor Signal Output: R/Y
17. Unused
18. Power Supply to ABS Motor Relay: R/W
 KIBS System Circuit
 KIBS Servicing Precautions
Electronic Steering Damper Warning Indicator Light
The yellow light functions as the
electronic steering damper warning indicator.
The light and warning symbol
"ESD" go on if there is a malfunction in
the electronic steering damper system.
However, this could also be caused by
trouble with the charging system (e.g.
battery). I ...
Engine Oil Change
Situate the motorcycle so that it is vertical after warming
up the engine.
Remove the engine oil drain bolt [A] to drain the oil.
The oil in the oil filter can be drained by removing the filter
(see Oil Filter Replacement).
Replace the drain bolt gasket [B] with a new one.
Tighten t ...
Fuel Pump Operating Voltage Inspection
NOTE
Be sure the battery is fully charged.
Turn the ignition switch to OFF.
Remove:
Fuel Tank Bolts (see Fuel Tank Removal)
Fuel Tank Bracket Bolts (see Fuel Tank Removal)
Disconnect the fuel pump lead connector and connect the
harness adapter [A] between these connectors as shown
i ...