
NOTE
Be sure the battery is fully charged.
Do not disconnect the ECU connector
Special Tool - Needle Adapter Set: 57001-1457
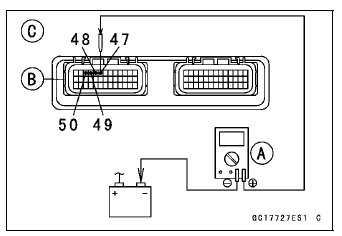
Primary Fuel Injector Output Voltage [C] Connections to ECU Connector:
For Primary Fuel Injector #1
Digital Meter (+) → BL/R lead (ECU terminal 47)
Digital Meter (–) → Battery (–) terminal
For Primary Fuel Injector #2
Digital Meter (+) → BL/O lead (ECU terminal 48)
Digital Meter (–) → Battery (–) terminal
For Primary Fuel Injector #3
Digital Meter (+) → BL/BK lead (ECU terminal 49)
Digital Meter (–) → Battery (–) terminal
For Primary Fuel Injector #4
Digital Meter (+) → BL/Y lead (ECU terminal 50)
Digital Meter (–) → Battery (–) terminal
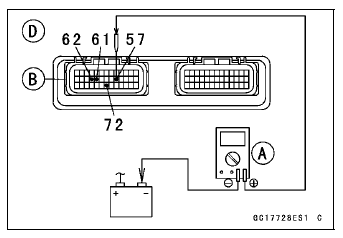
Secondary Fuel Injector Output Voltage [D]
Connections to ECU Connector: For Secondary Fuel Injector #1
Digital Meter (+) → O/R lead (ECU terminal 57)
Digital Meter (–) → Battery (–) terminal
For Secondary Fuel Injector #2
Digital Meter (+) → O/G lead (ECU terminal 72)
Digital Meter (–) → Battery (–) terminal
For Secondary Fuel Injector #3
Digital Meter (+) → O/BK lead (ECU terminal 61)
Digital Meter (–) → Battery (–) terminal
For Secondary Fuel Injector #4
Digital Meter (+) → O/Y lead (ECU terminal 62)
Digital Meter (–) → Battery (–) terminal
Output Voltage Standard: Battery Voltage for 3 seconds, and then 0 V
If the reading is in specification, check the ECU for its ground and power supply (see ECU Power Supply Inspection).
If the ground and power supply are good, replace the ECU (see ECU Removal/Installation).
If the reading is out of the specification, remove the ECU and check the wiring for continuity between main harness connectors.
Special Tool - Hand Tester: 57001-1394
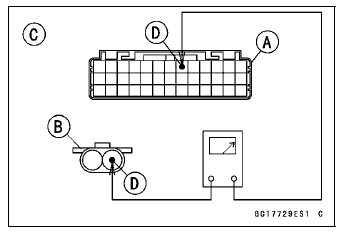
Wiring Continuity Inspection (Primary Fuel Injectors) ECU Connector (Gray) [A] ←→ Primary Fuel Injector Connector [B]
For Primary Fuel Injector #1 [C]
BL/R lead (ECU terminal 47) [D]
For Primary Fuel Injector #2
BL/O lead (ECU terminal 48)
For Primary Fuel Injector #3
BL/BK lead (ECU terminal 49)
For Primary Fuel Injector #4
BL/Y lead (ECU terminal 50)
Wiring Continuity Inspection (Secondary Fuel Injectors) ECU Connector (Gray) [A] ←→ Secondary Fuel Injector Connector [E]
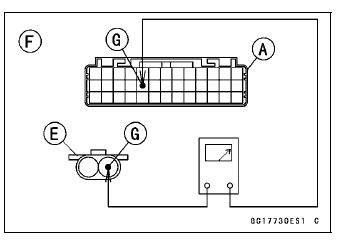
For Secondary Fuel Injector #1 [F]
O/R lead (ECU terminal 57) [G]
For Secondary Fuel Injector #2
O/G lead (ECU terminal 72)
For Secondary Fuel Injector #3
O/BK lead (ECU terminal 61)
For Secondary Fuel Injector #4
O/Y lead (ECU terminal 62)
 For Secondary Fuel Injectors
 Fuel Injector Fuel Line Inspection
KIBS Hydraulic Unit Terminal Names
1. Ground: BK
2. CAN Communication Line (High): GY/BL
3. Front Wheel Rotation Sensor Signal Input: Y
4. Power Supply: BR/W
5. KIBS Kawasaki Self-Daignosis System Terminal: P
6. Front and Rear Brake Light Switch Signal: BL/R
7. Unused
8. Front Wheel Rotation Sensor Signal Output: G/Y
9. P ...
Ball Bearing and Needle Bearing
Do not remove pressed ball or needle unless removal is
absolutely necessary. Replace with new ones whenever
removed. Press bearings with the manufacturer and size
marks facing out. Press the bearing into place by putting
pressure on the correct bearing race as shown.
Pressing the incorrect ra ...
Drive Chain Lubrication Condition Inspection
If a special lubricant is not available, a heavy oil such as
SAE 90 is preferred to a lighter oil because it will stay on
the chain longer and provide better lubrication.
If the chain appears especially dirty, clean it before lubrication.
NOTICE
The O-rings between the side plates seal ...