
Run the hose and lead correctly (see Cable, Wire, and Hose Routing section in the Appendix chapter).
Check the brake line.
Apply a non-permanent locking agent to the threads of the mud guard mounting bolts [A, B], and tighten them securely.
Mud Guard Mounting Bolt [A]: M6 × 14 mm (0.55 in.) Mud Guard Mounting Bolt [B]: M6 × 10 mm (0.39 in.) Mud Guard Mounting Bolt [C]: M6 Clamp [D] (Right Side)
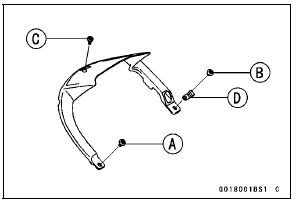
 Mud Guard Removal
 Rear View Mirrors
Jump starting
If your motorcycle battery is “run
down”, it should be removed and
charged. If this is not practical, a 12
volt booster battery and jumper cables
may be used to start the engine.
DANGER
Battery acid generates hydrogen
gas which is flammable and
explosive under certain conditions.
It i ...
Radiator Fan Relay Inspection
Refer to the Relay Circuit Inspection in the Electrical System
chapter
If the radiator fan relay is normal, check the wiring for
continuity, using the wiring diagram in this section.
Special Tool - Hand Tester: 57001-1394
If the wiring is good, check the ECU for its ground and
power supp ...
Special Tools
Inside Circlip Pliers:
57001-143
Oil Seal & Bearing Remover:
57001-1058
Bearing Driver Set:
57001-1129
Jack:
57001-1238
Bearing Remover Head, 15 ×
17:
57001-1267
Fork Oil Level Gauge:
57001-1290
Bearing Remover Shaft, 13:
57001-1377
Fork Oil Seal Driver, 43:
57001-15 ...