
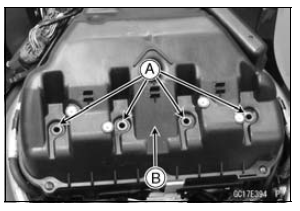
Push the four mounting positions of the injectors.
Set the joint pipe parallel to the air cleaner housing [B].
NOTICE
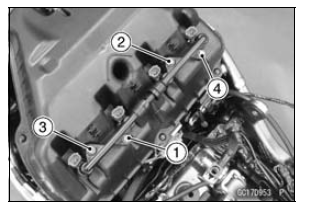
When installing the nozzle assy, apply force equally to the delivery pipe assy.
Pushing the fuel pipe strongly could damage it as it is made from resin.
Torque - Nozzle Assy Mounting Bolts: 4.9 N·m (0.50 kgf·m, 43 in·lb)
 Nozzle Assy Removal
 Nozzle Assy Disassembly
Damping Force Adjustment (
ZX1000JC/KC)
To adjust the damping force, turn the damping adjuster
[A] until you feel a click.
The standard adjuster setting is the 18th click from the
1st of the fully clockwise position. If the damping feels too
soft or too stiff, adjust it in accordance with the following
table.
Damping Force Adj ...
Exploded View
AL: Tighten the two clamp bolts alternately two times to ensure even
tightening torque.
HG: Apply high-temperature grease.
R: Replacement Parts
WL: Apply soap and water solution or rubber lubricant.
Specifications
WARNINGSome replacement tires may adversely
affect h ...
Race Mode Display
This mode gives priority to reading
the gear position rather than the
speedometer reading.
The gear position indicator can
be displayed at the position of the
speedometer on the normal mode.
Also the speedometer is displayed instead
of the clock on the normal mode.
This mode can be used ...