
NOTE
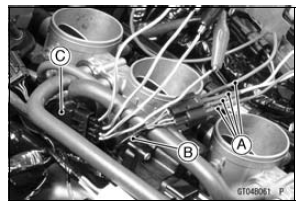
Main Harness [B] Idle Speed Control Valve Actuator [C]
Special Tool - Peak Voltage Adapter: 57001-1415 Type: KEK-54-9-B
Idle Speed Control Valve Actuator Input Voltage Connections to Adapter: (I) Digital Meter (+) → R (actuator G/R) lead Digital Meter (–) → Battery (–) terminal (II) Digital Meter (+) → W (actuator G/O) lead Digital Meter (–) → Battery (–) terminal (III) Digital Meter (+) → Y (actuator G/Y) lead Digital Meter (–) → Battery (–) terminal (IV) Digital Meter (+) → BK (actuator G/BK) lead Digital Meter (–) → Battery (–) terminal
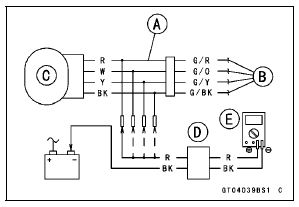
Input Voltage
Standard: About DC 9  11 V and then
1 V or
About DC 9  11 V
11 V
If the reading is out of the specification, remove the ECU and check the wiring for continuity between main harness connector.
Special Tool - Hand Tester: 57001-1394
Disconnect the ECU and actuator connectors.
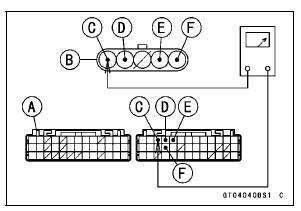
Wiring Continuity Inspection ECU Connector [A] ←→ Idle Speed Control Valve Actuator Connector [B] G/BK lead (ECU terminal 42) [C] G/Y lead (ECU terminal 43) [D] G/O lead (ECU terminal 44) [E] G/R lead (ECU terminal 56) [F]
If the wiring is good, check the ECU for its ground and power supply (see ECU Power Supply Inspection in the Fuel System (DFI) chapter).
If the ground and power supply are good, replace the ECU (see ECU Removal/Installation in the Fuel System (DFI) chapter).
Idle Speed Control Valve Actuator Circuit

1. ECU
2. Idle Speed Control Valve Actuator
 Idle Speed Control Valve Actuator Resistance Inspection
 Air Intake Solenoid Valve (Service Code 2d, Equipped Models)
Fuel Tank
The following octane rating gasoline
is recommended for the fuel tank.
Avoid filling the tank in the rain or where
heavy dust is blowing so that the fuel
does not get contaminated.
A. Tank Cap
B. Fuel Tank
C. Top Level
D. Filler Neck
WARNINGGasoline is extremely flammable
an ...
Oil and/or Oil Filter Change
To change the engine oil and replace
oil filter, the engine oil drain bolt and
oil filter must be removed. The oil
change and oil filter replacement
should be done by an authorized
Kawasaki dealer.
A. Engine Oil Drain Bolt
A. Oil Filter
WARNINGEngine oil is a toxic s ...
KIBS Warning Indicator Light (For models equipped
with KIBS)
The yellow warning indicator light in
the meter unit functions as the KIBS
warning indicator light. The yellow
warning indicator light and warning
symbol “KIBS” go on if there is a malfunction
in the KIBS system. When the
warning light is on, the KIBS system
stops functioning. However, th ...