
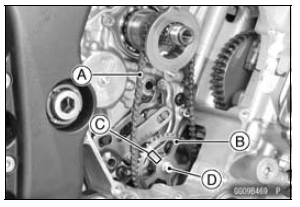
First, engage the oil pump chain [A] to the gears, and then install the oil pump drive gear [B].
Turn the “OUT” mark [C] to outside.
Apply a non-permanent locking agent to the oil pump drive chain guide bolt and the oil pump drive gear bolt.
Tighten the oil pump drive gear bolt [D] temporary.
The oil pump drive gear bolt is left-hand threads.
 Oil Pump Drive Gear Removal/Installation
 Oil Pump Drive Gear Shaft Removal
Switch Inspection
Using a hand tester, check to see that only the connections
shown in the table have continuity.
Special Tool - Hand Tester: 57001-1394
For the switch housings and the ignition switch, refer to
the tables in the Wiring Diagram.
If the switch has an open or short, repair it or replace it
w ...
License Plate Light Bulb Replacement
Remove:
Screws [A]
License Plate Light Cover [B]
Pull the bulb [A] out of the socket [B].
NOTICE
Do not turn the bulb. Pull the bulb out to prevent
damage to the bulb. Do not use bulb rated for
greater wattage than the specified value.
Replace the bulb with a new one.
In ...
Headlight Aiming Adjustment
NOTE
Do not turn the bolts [A] because the reflector in the
headlight comes off.
(In the photo, the headlight unit has been removed for
clarity.)
NOTE
The left adjuster [A] and right adjuster [B] can move the
direction of the headlight beam to up, down, left and
right by turning each a ...