
| WARNING This battery is sealed type. Charge with current and time as stated below. |
Terminal Voltage: 12.0  12.7
12.7
V
Standard Charge (see following chart):
ZX1000J: 0.6 A × 5  10 h
10 h
ZX1000K: 0.9 A × 5  10 h
10 h
Quick Charge
ZX1000J: 3 A × 5  1 h
1 h
ZX1000K: 4.5 A × 1 h
NOTICE
If possible, do not quick charge. If quick charge is done unavoidably, do standard charge later on.
Terminal Voltage: 12 V or lower Charging Method: 0.6 A × 20 h
Kawasaki-recommended chargers: Battery Mate 150-9
OptiMate PRO 4-S/PRO S/PRO 2
Yuasa MB-2040/2060
Christie C10122S
NOTE
Increase the charging voltage to a maximum voltage of 25 V if the battery will not accept current initially. Charge for nomore than 5minutes at the increased voltage then check if the battery is drawing current. If the battery will accept current decrease the voltage and charge by the standard charging method described on the battery case. If the battery will not accept current after 5 minutes, replace the battery.
Battery [A] Battery Charger [B] Standard Value [C] Current starts to flow [D].
Determine the battery condition left for 30 minutes after
completion of the charge by measuring the terminal voltage
according to the table below. 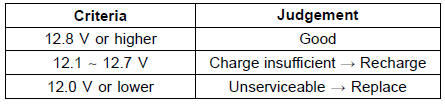
 Charging Condition Inspection
 Charging System
Sidestand Switch Operation Inspection
Raise the rear wheel off the ground with the stand (see
Rear Wheel Removal in the Wheels/Tires chapter).
Inspect the sidestand switch [A] operation accordance to
below table.
Sidestand Switch Operation
If the sidestand switch operation does not work, inspect
or replace the foll ...
Front Fork Assembly
Replace the following parts with new ones.
Slide Bushing
Guide Bushing
Oil Seal
Install the following parts to the inner tube [A].
Dust Seal [B]
Retaining Ring [C]
Apply grease to the oil seal lips.
Install the oil seal [A] so that the stamp side faces lower
side.
Insta ...
IC Igniter Inspection
The IC igniter is built in the ECU [A].
Refer to the following items.
Interlock Operation Inspection (see Interlock Operation
Inspection)
Ignition System Troubleshooting (see Ignition System
section)
ECU Power Supply Inspection (see ECU Power Supply
Inspection in the Fuel System (D ...