
When repair has been done, warning indicator light (LED) and warning symbol go off and service code are not displayed.
But the service codes stored in memory of the ECU are not erased to preserve the problem history.
In this model, the problem history can not be erased. However, the memories of the KIBS and ABS system service codes can be erased using the KDS 3 version kit.
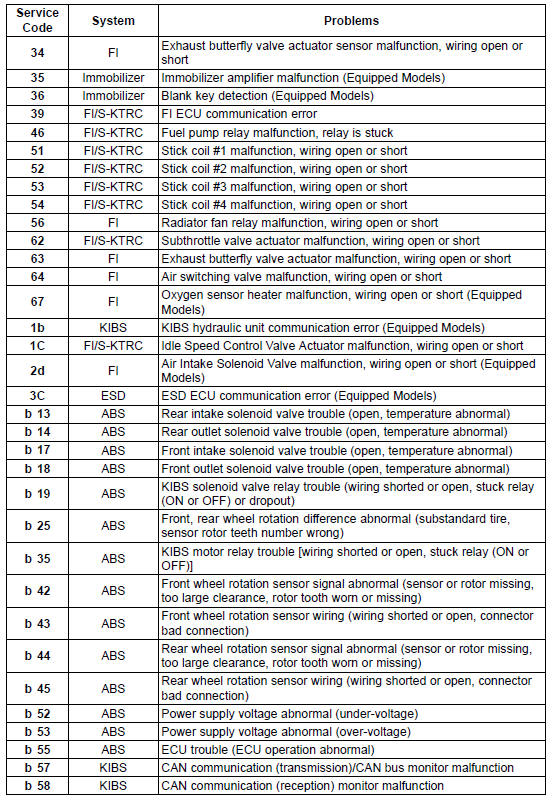
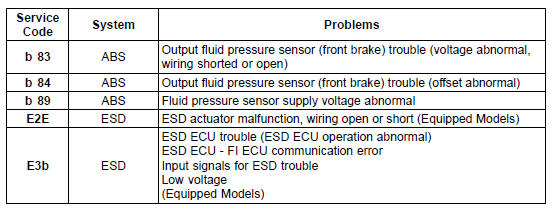
The service codes of the immobilizer, KIBS and ABS, and ESD systems appear to each system equipped models.

Notes:
 Service Code Reading
 Backups
Clutch Cover Removal
Remove:
Right Lower Fairing (see Lower Fairing Removal in the
Frame chapter)
Clutch Cable Lower End (see Cable Removal)
Clutch Cover Bolts [A]
Turn the release lever [A] counterclockwise as shown,
and remove the clutch cover.
About 90° [B]
...
Starter Motor Assembly
Install the positive brush assy [A] and the starter motor
terminal [B] as shown in the figure.
Replace the O-ring [C] with a new one, and install it.
Install:
Brush Springs [A]
Negative Brush Assy [B]
Turn the stopper side [C] to inside.
Tighten:
Torque - Brush Holder S ...
Special Tools and Sealant
Hand Tester:
57001-1394
Flywheel Puller Assembly, M38 × 1.5/M35 × 1.5:
57001-1405
Peak Voltage Adapter:
57001-1415
Lead Wire - Peak Voltage Adapter:
57001-1449
Key Registration Unit:
57001-1582
Grip:
57001-1591
Flywheel & Pulley Holder:
57001-1605
Rotor Holder:
...