Kawasaki Ninja Service Manual: Service Code Reading
The service code(s) is displayed on the LCD by the number
of two digits.
NOTE
- The service code of the KIBS and ABS adds “b” at the
left side of the code.
- The service code of the ESD adds “E” at the left side of
the code.

- When there are a number of problems, all the service
codes can be stored and the display will begin starting
from the lowest number service code in the numerical order.
- Then after completing all codes, the display is repeated
until the ignition switch is turned to OFF or upper button
and lower button are pushed for more than two seconds.
- The order of the system’s appearing is the order of
DFI System, Immobilizer System (equipped models),
S-KTRC System, KIBS and ABS (equipped models), and
ESD System (ZX1000JD/KD).
- For example, if three problems occurred in the order of
46, 16, 33, the service codes are displayed (each two
seconds) from the lowest number in the order listed as
shown below.
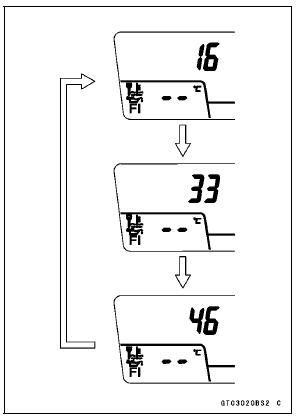
(16 → 33 → 46) → (16 → 33 → 46) → → ····· (repeated)
- If the no problem or when the repair has been done, warning
indicator light (LED) and warning symbol go off and
service code is not displayed.
NOTE
Use a fully charged battery when conducting
self-diagnosis. Otherwise, the light (LED) and symbol
do not light or blink.
Turn the ignition switch to ON.
When a problem occurs with D ...
When repair has been done, warning indicator light (LED) and warning symbol
go off and service
code are not displayed.
But the service codes stored in memory of the ECU are not erased to preserve ...
Other materials:
Instrument display brightness control
The brightness of the tachometer
LED segments and illumination of the
multifunction meter are controlled automatically
depending on the ambient
brightness.
A. Tachometer
B. Ambient Brightness Sensor
C. Multifunction Meter
NOTE
Be careful not to cover the ambient
brightness sensor on th ...
Tire Installation
WARNINGSome replacement tires may adversely
affect handling
and cause an accident resulting in serious injury
or death. To ensure proper handling and stability,
use only the recommended standard tires for
replacement, inflated to the standard pressure.
Inspect the rim ...
Fuel Injector Output Voltage Inspection
NOTE
Be sure the battery is fully charged.
Turn the ignition switch to OFF.
Remove the ECU (see ECU Removal).
Do not disconnect the ECU connector
Connect a digital meter [A] to the connector (gray) [B] with
the needle adapter set.
Special Tool - Needle Adapter Set: 57001-1457
...