
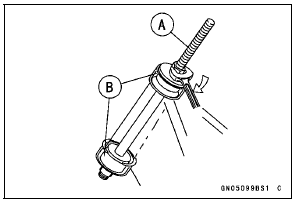
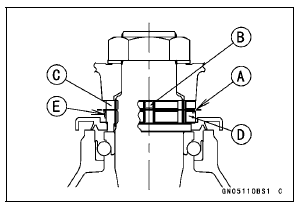
Special Tools - Head Pipe Outer Race Press Shaft [A]: 57001-1075
Head Pipe Outer Race Driver, 
55 [B]: 57001
-1446 or Bearing Driver Set: 57001-1129
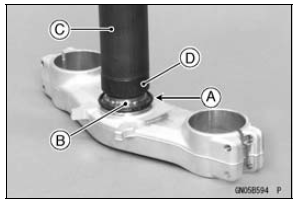
Special Tools - Steering Stem Bearing Driver,
 42.5 [C]:
57001-1344
Steering Stem Bearing Driver Adapter,

41.5 [D]: 57001-1345
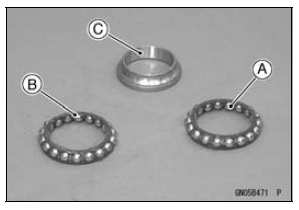
The lower and upper ball bearings are identical.
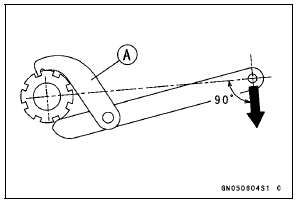
Tighten the steering stem nut with 55 N·m (5.6 kgf·m, 41 ft·lb) of torque first, and loosen it a fraction of a turn until it turns lightly. Afterward tighten it again with specified torque using a steering stem nut wrench [A].
Check that there is no play and the steering stem turns smoothly without rattles. If not, the steering stem bearings may be damaged.
Special Tool - Steering Stem Nut Wrench: 57001-1100
Torque - Steering Stem Nut: 20 N·m (2.0 kgf·m, 15 ft·lb)
NOTE
Torque - Front Fork Clamp Bolts (Upper): 20 N·m (2.0 kgf·m, 15 ft·lb) Steering Stem Head Nut: 78 N·m (8.0 kgf·m, 58 ft·lb) Front Fork Clamp Bolts (Lower): 23 N·m (2.3 kgf·m, 17 ft·lb) Handlebar Clamp Bolts: 25 N·m (2.5 kgf·m, 18 ft·lb)
| WARNING If the handlebar does not turn to the steering stop it may cause an accident resulting in injury or death. Be sure the cables, harnesses and hoses are routed properly and do not interfere with handlebar movement (see Cable, Wire, and Hose Routing section in the Appendix chapter). |
Steering Stem Bearing Lubrication
 Stem, Stem Bearing Removal
 Steering Stem Warp Inspection
Air Cleaner
A clogged air cleaner restricts the engine’s
air intake, increasing fuel consumption,
reducing engine power, and
causing spark plug fouling.
This motorcycle’s air cleaner element
consists of a wet paper filter, which cannot
be cleaned.
The air cleaner element must be replaced
in acco ...
Throttle Body Assy Disassembly
1. Throttle Body Assy
2. Subthrottle Valve Actuator
3. Idle Speed Control Valve Actuator
4. Main Throttle Sensor
5. Subthrottle Sensor
6. Primary Fuel Injectors
7. Delivery Pipe Assy
NOTICE
Do not remove, disassemble or adjust the main
throttle sensor, subthrottle sensor, subthrottle
v ...
Piston Installation
Apply molybdenum disulfide oil solution to the oil ring expander,
and install the oil ring expander [A] in the bottom
piston ring groove so the ends [B] not butt together
Applymolybdenum disulfide oil solution to the oil ring steel
rails, and install the oil ring steel rails, one above th ...