
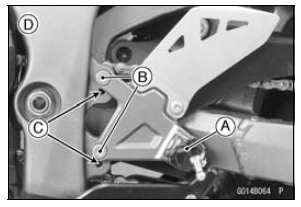
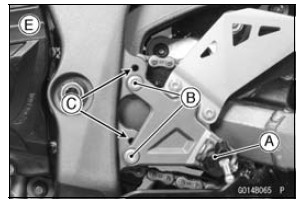
Footpeg Height Adjustment
Footpeg [A] Bolts [B] Bolt Holes [C] Footpeg Position 1 [D] Footpeg Position 2 [E]
NOTE
Install the front footpegs with same height on both sides.
Tighten: Torque - Front Footpeg Bracket Bolts: 25 N·m (2.5 kgf·m, 18 ft·lb)
 Sidestand Installation
Wheel Rotation Sensor Rotor Inspection
Remove:
Wheels (see Front/Rear Wheel Removal in the
Wheels/Tires chapter)
Brake Disc Mounting Bolts [A]
Sensor Rotor [B]
Front Wheel [C]
Rear Wheel [D]
Visually inspect the wheel rotation sensor rotor.
If the rotor is deformed or damaged (chipped teeth [A]),
replace the ...
Piston Installation
Apply molybdenum disulfide oil solution to the oil ring expander,
and install the oil ring expander [A] in the bottom
piston ring groove so the ends [B] not butt together
Applymolybdenum disulfide oil solution to the oil ring steel
rails, and install the oil ring steel rails, one above th ...
Oil Level Inspection
If the oil has just been changed, start
the engine and run it for severalminutes
at idle speed. This fills the oil
filter with oil. Stop the engine, then
wait several minutes until the oil settles.
NOTICE
Racing the engine before the oil
reaches every part can cause engine
seizure.
...
