
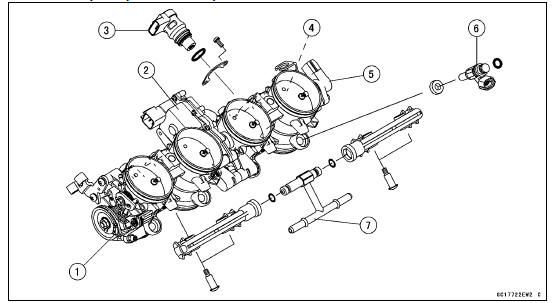
1. Throttle Body Assy
2. Subthrottle Valve Actuator
3. Idle Speed Control Valve Actuator
4. Main Throttle Sensor
5. Subthrottle Sensor
6. Primary Fuel Injectors
7. Delivery Pipe Assy
NOTICE
Do not remove, disassemble or adjust the main throttle sensor, subthrottle sensor, subthrottle valve actuator, throttle link mechanism and throttle body assy, because they are adjust or set surely at the manufacturer. Adjustment of these parts could result in poor performance, requiring replacement of the throttle body assy.
NOTE
Do not damage the insertion portions of the injectors when they are pulled out from the throttle body.

NOTE
NOTICE
Never drop the primary fuel injector especially on a hard surface. Such a shock to the injector can damage it.
 Throttle Body Assy Installation
 Throttle Body Assy Assembly
Torque Limiter Removal
Remove:
Starter Motor (see Starter Motor Removal in the Electrical
System chapter)
Throttle Body Assy Holder [A]
Breather Hose [B]
Roll up the heat insulation rubber plate [C].
Remove:
Torque Limiter Cover Bolts [A]
Torque Limiter Cover [B]
Remove:
Torque Limit ...
Upper Fairing Assembly Removal
Remove:
Lower Fairings (see Lower Fairing Removal)
Center Inner Fairing (see Center Inner Fairing Removal)
Upper Inner Fairings (see Upper Inner Fairing Removal)
Windshield (see Windshield Removal)
Disconnect the front turn signal light lead connector [A]
(both sides).
Remove the bo ...
Exhaust Butterfly Valve Actuator Sensor Resistance Inspection
Turn the ignition switch to OFF.
Disconnect the exhaust butterfly valve actuator sensor
connector (3 pins connector) [A] (see Exhaust Butterfly
Valve Actuator Sensor Input Voltage Inspection).
Connect a digital meter [B] to the exhaust butterfly valve
actuator sensor connector.
Measur ...