
| WARNING Some replacement tires may adversely affect handling and cause an accident resulting in serious injury or death. To ensure proper handling and stability, use only the recommended standard tires for replacement, inflated to the standard pressure. |
NOTICE
Replace the air valve whenever the tire is replaced.
Do not reuse the air valve.
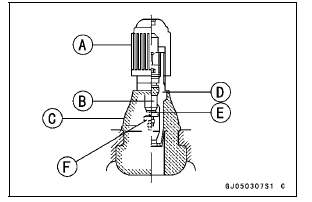
Remove the valve cap, lubricate the stem seal [A] with a soap and water solution or rubber lubricant, and pull [B] the valve stem through the rim from the inside out until it snaps into place.
NOTICE
Do not use engine oil or petroleum distillates to lubricate the stem because they will deteriorate the rubber.
Valve Cap [A] Valve Core [B] Stem Seal [C] Valve Stem [D] Valve Seat [E] Valve Opened [F]
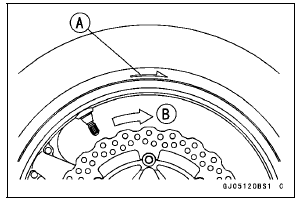
Tire Rotation Mark [A] Rotating Direction [B]
| WARNING Overinflating a tire can cause it to explode, causing serious injury or death. Be sure to install the valve core whenever inflating the tire, and do not inflate the tire to more than 400 kPa (4.0 kgf/cm², 57 psi). |
If the rim flanges and tire sidewall rim lines are not parallel, remove the valve core.

Inflate the tire slightly above standard inflation.
Use a soap and water solution or submerge the tire, and check for bubbles that would indicate leakage.
 Tire Removal
 Tire Repair
Cooling System Flushing
Over a period of time, the cooling system accumulates
rust, scale, and lime in the water jacket and radiator. When
this accumulation is suspected or observed, flush the cooling
system. If this accumulation is not removed, it will clog
up the water passage and considerable reduce the efficiency
...
Exploded View
11. ZX1000JD/KD
AD: Apply adhesive.
AL: Tighten the two clamp bolts alternately two times to ensure even tightening
torque.
G: Apply grease.
L: Apply a non-permanent locking agent.
Specifications
...
Engine Removal
Support the rear part of the swingarm with a stand.
Squeeze the brake lever slowly and hold it with a band
[A].
WARNINGMotorcycle may fall over unexpectedly
resulting in
an accident or injury. Be sure to hold the front brake
when removing the engine.
NOTICE
Be sure ...