
As the tire tread wears down, the tire becomes more susceptible to puncture and failure. An accepted estimate is that 90% of all tire failures occur during the last 10% of tread life (90% worn).
So it is false economy and unsafe to use the tires until they are bald
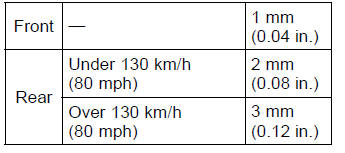
A. Tire Depth Gauge
Minimum Tread Depth
NOTE
Have the wheel balance inspected whenever a new tire is installed.
| WARNING Tires that have been punctured and repaired do not have the same capabilities as undamaged tires and can suddenly fail, causing an accident resulting in serious injury or death. Replace damaged tires as soon as possible. To ensure safe handling and stability, use only the recommended standard tires for replacement, inflated to the standard pressure. If it is necessary to ride on a repaired tire, do not exceed 100 km/h (60 mph) until the tire is replaced. |
NOTE
When operating on public roadways, keep maximum speed under traffic law limits.
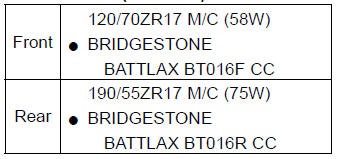
Standard Tire (Tubeless)
| WARNING Some replacement tires may adversely affect handling and cause an accident resulting in serious injury or death. To ensure proper handling and stability, use only the recommended standard tires for replacement, inflated to the standard pressure. New tires are slippery and may cause loss of control and injury. A break-in period of 160 km (100 miles) is necessary to establish normal tire traction. During break-in, avoid sudden and maximum braking and acceleration, and hard cornering. |
 Payload and Tire Pressure
 Battery
ECU Identification
Most countries have their own regulations, so each ECU
has different characteristic. So, do not confuse ECU with
each other and use only the ECU for your model. Otherwise,
the motorcycle can not clear the regulation.
ECU Identification
ZX1000JB/KB
ZX1000JC /KC
...
Parking
WARNINGOperating or parking the vehicle
near flammable materials can
cause a fire, and can result in
property damage or severe personal
injury.
Do not idle or park your vehicle
in an area where tall or dry vegetation,
or other flammable materials
could come into cont ...
Crankcase Halves Assembly
Install:
Crankshaft (see Crankshaft Installation)
Connecting Rods (see Connecting Rod Installation)
Using a cleaning fluid, clean off any oil or dirt on the mating
surface of the crankcase halves.
Apply liquid gasket to the mating surface of the lower
crankcase half as shown in the fi ...