
Special Tool - Inside Circlip Pliers: 57001-143
Special Tool - Bearing Driver Set [B]: 57001-1129

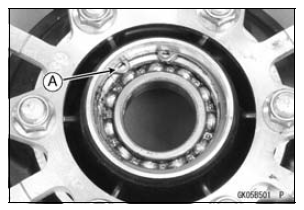
 Coupling Installation
 Coupling Bearing Installation
For Primary Fuel Injectors
Remove the air cleaner housing (see Air Cleaner Housing
Removal).
Disconnect the injector connector and connect the harness
adapter [A] between these connectors as shown in
the figure.
Main Harness [B]
Primary Fuel Injector #1 [C]
Special Tool - Measuring Adapter: 57001-1700
...
KIBS Hydraulic Unit Communication Error (Service Code 1b, KIBS Equipped
Models)
KIBS Hydraulic Unit Communication Line Inspection
When the data (for status of KIBS hydraulic unit) is not
sent from the KIBS hydraulic unit to the meter unit and
ECU, the service code 1b is displayed.
The data is sent through the CAN communication line.
The service code 1b is detected with the ...
Piston Ring Groove Width Inspection
Measure the piston ring groove width.
Use a vernier caliper at several points around the piston.
Piston Ring Groove Width
Standard:
Top [A] 0.82 0.84 mm (0.0323
0.0331 in.)
Second [B] 0.82 0.84 mm
(0.0323 0.0331 in.)
Service Limit:
0.92 mm (0.036 in.)
Second 0.92 mm (0.036 in.)
...