
NOTICE
Never drop the air switching valve especially on a hard surface. Such a shock to the air switching valve can damaged it.
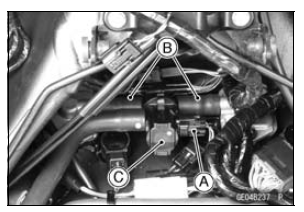
 Air Suction Valve Inspection
 Air Switching Valve Installation
Front Fork Disassembly
Remove the front fork (see Front Fork Removal (Each
Fork Leg))
Drain the fork oil (see Front Fork Oil Change).
Take the dust seal [A] off the outer tube.
Remove the retaining ring [B].
Separate the outer tube from the inner tube.
Remove the following parts from the inner tube. ...
Rear Caliper Holder Shaft Wear
The caliper body must slide smoothly on the caliper holder
shafts [A]. If the body does not slide smoothly, one pad will
wear more than the other, pad wear will increase, and constant
drag on the disc will raise brake and brake fluid temperature.
Check to see that the caliper holder shafts ar ...
Coolant Level Inspection
Situate the motorcycle so that it is
perpendicular to the ground.
Check the coolant level through the
coolant level gauge on the reserve
tank located to the left of the engine.
The coolant level should be between
the “F” (Full) and “L” (Low) level lines.
A. Reserve Ta ...