
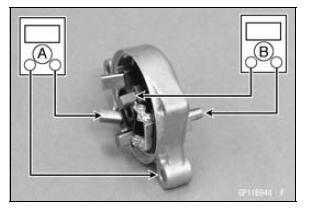
Right-hand End Cover and Negative Brushes [A] Terminal Bolt and Positive Brushes [B]
Special Tool - Hand Tester: 57001-1394
If there is not close to zero ohms, the brush lead has an open. Replace the brush plate assy.
 Armature Inspection
 Right-hand End Cover Inspection
Connecting Rod Installation
NOTICE
To minimize vibration, the connecting rods should
have the same weight mark.
Big End Cap [A]
Connecting Rod [B]
Weight Mark, Alphabet [C]
Diameter Mark [D] (“” or No Mark)
NOTICE
If the connecting rods, big end bearing inserts, or
crankshaft are replaced with new ones, select ...
Rear Shock Absorber Inspection
Press down on the seat several times
to inspect the stroke.
Visually inspect the rear shock absorber
for oil leaks.
If there is any doubt about the rear
shock absorber, it should be inspected
by an authorized Kawasaki
dealer.
A. Rear Shock Absorber
Spring Preload Adjustment
...
Air Cleaner
A clogged air cleaner restricts the engine’s
air intake, increasing fuel consumption,
reducing engine power, and
causing spark plug fouling.
This motorcycle’s air cleaner element
consists of a wet paper filter, which cannot
be cleaned.
The air cleaner element must be replaced
in acco ...