
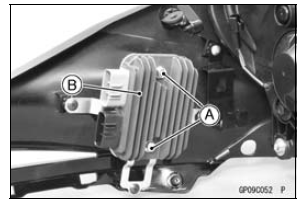
Special Tool - Hand Tester: 57001-1394
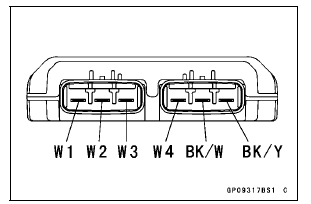
If the tester readings are not as specified, replace the regulator/rectifier.
NOTICE
Use only Kawasaki Hand Tester 57001-1394 for this test. A tester other than the Kawasaki Hand Tester may show different readings.
If a megger or a meter with a large capacity battery is used, the regulator/rectifier will be damaged.
Regulator/Rectifier Resistance (Unit: kΩ)
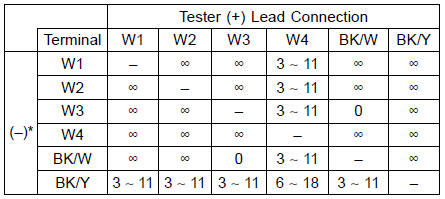
(−)*: Tester (−) Lead Connection
Charging System Circuit
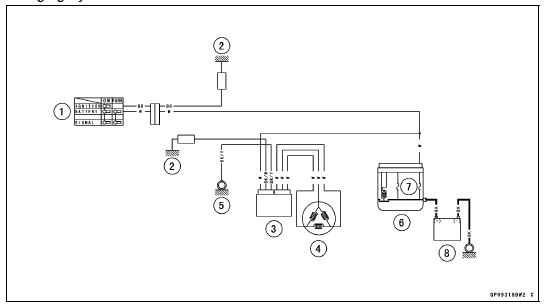
1. Ignition Switch
2. Load
3. Regulator/Rectifier
4. Alternator
5. Frame Ground
6. Starter Relay
7. Main Fuse 30 A
8. Battery
 Alternator Inspection
 Ignition System
Chain Slack Inspection
Set the motorcycle up on its side
stand.
Rotate the rear wheel to find the position
where the chain is tightest, and
measure the maximum chain slack
by pulling up and pushing down the
chain midway between the engine
sprocket and rear wheel sprocket.
A. Chain Slack
If the ...
Special Tools and Sealant
Compression Gauge, 20 kgf/cm²:
57001-221
Valve Spring Compressor Assembly:
57001-241
Valve Spring Compressor Adapter,
25:
57001-1019
Valve Seat Cutter, 45° - 27.5:
57001-1114
Valve Seat Cutter, 45° - 32:
57001-1115
Valve Seat Cutter, 32° - 28:
57001-1119
Valve Seat Cutter ...
Seat Cutter Operation Care
1. This valve seat cutter is developed to grind the valve for
repair. Therefore the cutter must not be used for other
purposes than seat repair.
2. Do not drop or shock the valve seat cutter, or the diamond
particles may fall off.
3. Do not fail to apply engine oil to the valve seat cutter
...