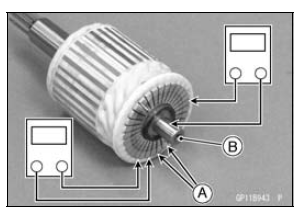

Special Tool - Hand Tester: 57001-1394
If there is a high resistance or no reading (∞) between any two segments, a winding is open and the starter motor must be replaced.
If there is any reading at all, the armature has a short and the starter motor must be replaced.

NOTE
Even if the foregoing checks show the armature to be good, it may be defective in some manner not readily detectable with the hand tester. If all other starter motor and starter motor circuit components check good, but the starter motor still does not turn over or only turns over weakly, replace the starter motor with a new one.
 Commutator Cleaning and Inspection
 Brush Lead Inspection
Spring Plate Free Play Measurement
Insufficient clutch free play will cause the engine braking
effect to be more sudden, resulting in rear wheel hop. On
the other hand, if the free play is excessive, the clutch lever
may feel “spongy” or pulsate when pulled.
Hold an extra drive shaft in a vise and install the following
c ...
Gear Position Switch Installation
Securely place the springs [A] and pins [B] into the holes
[C] of the shift drum.
Apply grease to the new O-ring [D].
Install the gear position switch [E].
Apply a non-permanent locking agent to the threads of
the gear position switch screws [F].
Tighten:
Torque - Gear Position Swit ...
Economical Riding Indicator
When the operator is driving the motorcycle
for optimum fuel-efficiency, the
economical riding indicator appears on
the multifunction meter to indicate favorable
fuel consumption. Monitoring
the economical riding indicator can
help the rider maximize fuel efficiency.
A. Economical Riding ...